通过前面的章节,我们已经了解了Istio的很多功能,例如基本版本的路由等,可以在单个Kubernetes集群上很容易地实现。而很多真实的业务场景中,基于微服务的应用程序并非那么简单,而是需要在多个位置跨集群去分配和运行服务。那么问题就来了,是否Istio的这些功能同样可以很简单地运行在这些真实的复杂环境中呢?
下面我们将会通过一个示例来了解Istio的流量管理功能如何在具有多个控制平面拓扑的多集群网格中正常运行。
1)首先,部署版本v1的helloworld服务到第一个集群cluster1中,执行如下命令:
kubectl create namespace hello
kubectl label namespace hello istio-injection=enabled
kubectl apply -n hello -f samples/sleep/sleep.yaml
kubectl apply -n hello -f samples/helloworld/service.yaml
kubectl apply -n hello -f samples/helloworld/helloworld.yaml -l version=v1
2)部署版本v2与v3的helloworld服务到第二个集群cluster2中,执行如下命令:
kubectl create namespace hello
kubectl label namespace hello istio-injection=enabled
kubectl apply -n hello -f samples/helloworld/service.yaml
kubectl apply -n hello -f samples/helloworld/helloworld.yaml -l version=v2
kubectl apply -n hello -f samples/helloworld/helloworld.yaml -l version=v3
3)如前面章节中所述,多控制平面下,需要使用以.global为后缀的DNS名称访问远程服务。在我们的例子中,它是helloworld.hello.global,所以我们需要在集群cluster1中创建服务条目ServiceEntry和目标规则DestinationRule。服务条目ServiceEntry将使用集群cluster2的入口网关作为端点地址来访问服务。
通过使用以下命令在集群cluster1中创建helloworld服务对应的服务条目ServiceEntry和目标规则DestinationRule:
kubectl apply -n hello -f - <<EOF
apiVersion: networking.istio.io/v1alpha3
kind: ServiceEntry
metadata:
  name: helloworld
spec:
  hosts:
  - helloworld.hello.global
  location: MESH_INTERNAL
  ports:
  - name: http1
    number: 5000
    protocol: http
  resolution: DNS
  addresses:
  - 127.255.0.8
  endpoints:
  - address: ${CLUSTER2_GW_ADDR}
    labels:
      cluster: cluster2
    ports:
      http1: 15443 # Do not change this port value
---
apiVersion: networking.istio.io/v1alpha3
kind: DestinationRule
metadata:
  name: helloworld-global
spec:
  host: helloworld.hello.global
  trafficPolicy:
    tls:
      mode: ISTIO_MUTUAL
  subsets:
  - name: v2
    labels:
      cluster: cluster2
  - name: v3
    labels:
      cluster: cluster2
EOF
4)在两个集群上创建目标规则。在集群cluster1中创建子集v1对应的目标规则,执行如下命令:
kubectl apply -n hello -f - <<EOF
apiVersion: networking.istio.io/v1alpha3
kind: DestinationRule
metadata:
  name: helloworld
spec:
  host: helloworld.hello.svc.cluster.local
  trafficPolicy:
    tls:
      mode: ISTIO_MUTUAL
  subsets:
  - name: v1
    labels:
      version: v1
EOF
而在集群cluster2中创建子集v2和v3对应的目标规则,执行如下命令:
kubectl apply -n hello -f - <<EOF
apiVersion: networking.istio.io/v1alpha3
kind: DestinationRule
metadata:
  name: helloworld
spec:
  host: helloworld.hello.svc.cluster.local
  trafficPolicy:
    tls:
      mode: ISTIO_MUTUAL
  subsets:
  - name: v2
    labels:
      version: v2
  - name: v3
    labels:
      version: v3
EOF
5)创建虚拟服务以路由流量。应用下面的虚拟服务将会使得来自用户jason对helloworld的流量请求指向位于集群cluster2中的版本v2和v3,其中v2比例为70%,v3比例为30%;来自任何其他用户对helloworld的流量请求都将转到位于集群cluster1中的版本v1:
kubectl apply -n hello -f - <<EOF
apiVersion: networking.istio.io/v1alpha3
kind: VirtualService
metadata:
  name: helloworld
spec:
  hosts:
    - helloworld.hello.svc.cluster.local
    - helloworld.hello.global
  http:
  - match:
    - headers:
        end-user:
          exact: jason
    route:
    - destination:
        host: helloworld.hello.global
        subset: v2
      weight: 70
    - destination:
        host: helloworld.hello.global
        subset: v3
      weight: 30
  - route:
    - destination:
        host: helloworld.hello.svc.cluster.local
        subset: v1
EOF
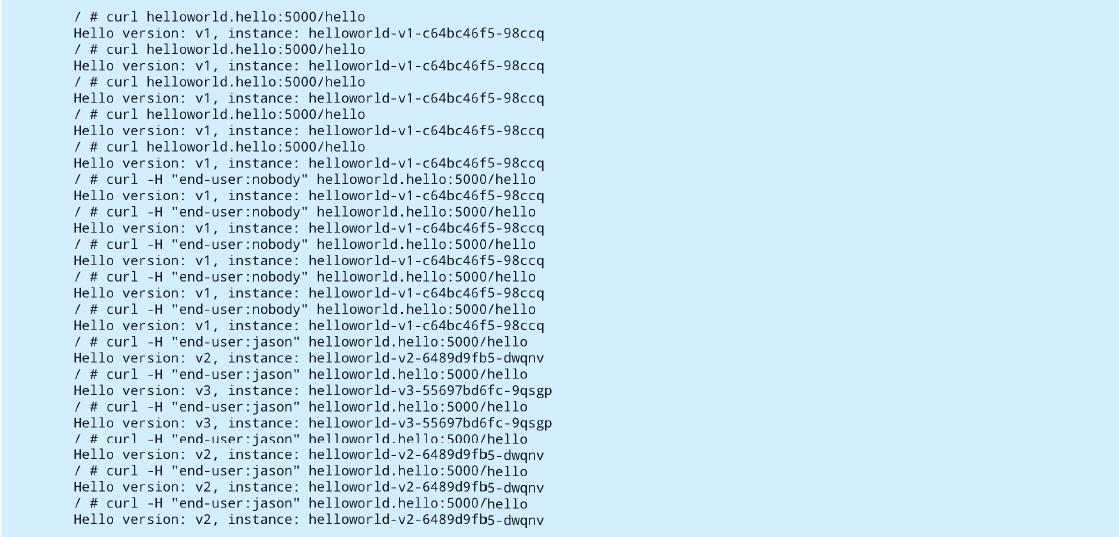
执行多次调用,可以从下面的执行结果中看出,上述流量路由的规则生效,这也说明了在多控制平面拓扑下,用于路由的规则定义与在本地集群的使用方式是一样的:
设置多集群网格的最简单方法是使用多控制平面拓扑,因为它没有特殊的网络要求。通过上述示例可以看出,在单个Kubernetes集群上运行的路由功能同样很容易地在多个集群中使用运行。