接着,按照如下步骤安装部署Istio。
1)进入到Istio release下载页面https://github.com/istio/istio/releases,下载对应目标操作系统的安装文件。在macOS或者Linux系统中,还可以运行下面的命令,进行下载和自动解压缩:
curl -L https://git.io/getLatestIstio | sh -
2)进入Istio包目录。例如,假设这个安装包是istio-1.4.0,进入该目录即执行cd istio-1.4.0。
安装目录中包含以下内容:
·install/目录中包含了Kubernetes安装所需的.yaml文件。
·samples/目录保存示例应用。
·bin/目录保存istioctl客户端文件,istioctl的功能是手工进行Envoy Sidecar的注入等其他操作。
·istio.VERSION为配置文件。
然后,把istioctl客户端加入PATH环境变量。
3)通过Helm命令,安装istio-init Helm Chart以创建所有Istio所需的自定义资源CRD:
helm install install/kubernetes/helm/istio-init --name istio-init --namespace istio-system
4)使用以下命令验证是否已将所有Istio CRD提交到Kubernetes api-server:
kubectl get crds | grep 'istio.io\|certmanager.k8s.io' | wc -l
5)通过Helm命令,安装istio Helm Chart以创建Istio组件:
helm install install/kubernetes/helm/istio --name istio --namespace istio-system
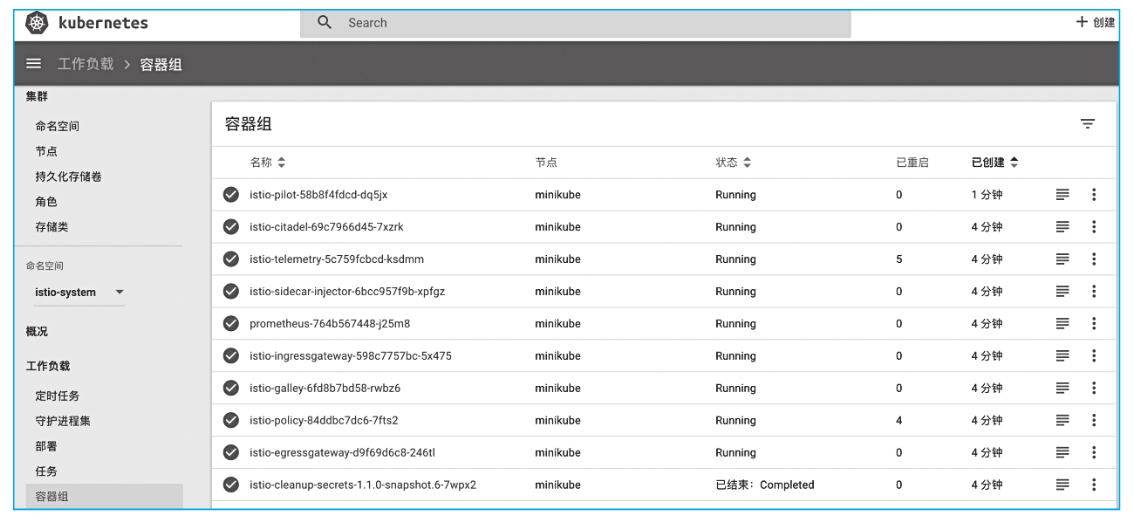
执行上述命令之后,等待几分钟,待所有Istio相关的容器启动正常之后,查看Kubernetes控制台,得到如图2-1所示的画面。
图2-1 安装后的Istio资源
如果在启动过程中,由于内存限制不能正常启动istio-pilot,可以修改istio-pilot部署YAML定义中的内存大小,默认为2Gi;此外还可以修改istio-pilot的容器组水平伸缩器,将最大副本数从5减小到1,如图2-2所示。
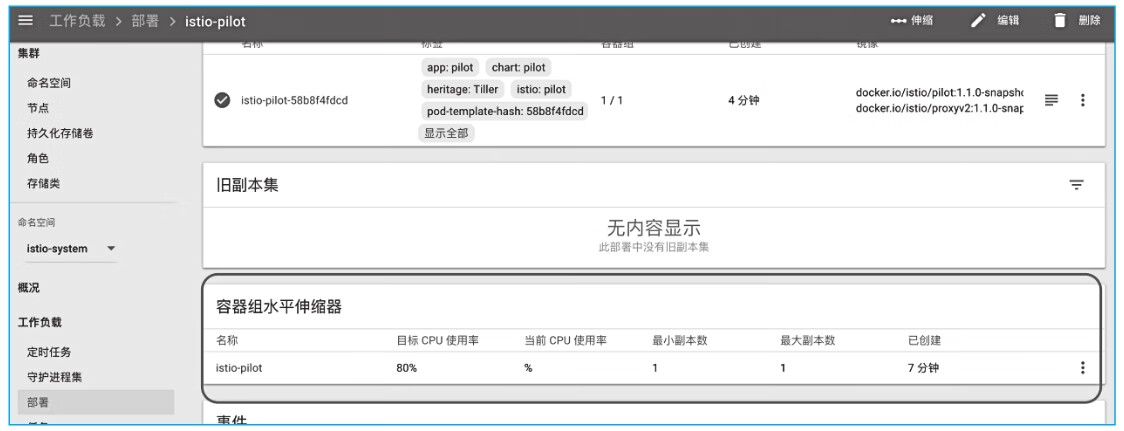
图2-2 Istio Pilot容器组
如果需要调整Minikube虚拟机的内存大小,可以通过conf ig命令进行配置,如下所示:
minikube config set memory 8192
These changes will take effect upon a minikube delete and then a minikube start
如提示所言,需要删掉已有的Minikube,重新启动一个才会生效。其实也可以通过直接修改虚拟机内存和CPU的方式进行调整,即执行minikube stop命令,等待虚拟机停止之后,通过VirtualBox界面调整内存和CPU,然后重新启动Minikube使这些配置生效,如下所示:
minikube start
Starting local Kubernetes v1.10.0 cluster...
Starting VM...
Getting VM IP address...
Kubernetes version downgrade is not supported. Using version: v1.12.1
Moving files into cluster...
Setting up certs...
Connecting to cluster...
Setting up kubeconfig...
Starting cluster components...
Kubectl is now configured to use the cluster.
Loading cached images from config file.
kubectl label namespace default istio-injection=enabled
kubectl apply -f samples/bookinfo/platform/kube/bookinfo.yaml
kubectl apply -f samples/bookinfo/networking/bookinfo-gateway.yaml
要获取Minikube的ip地址,执行如下命令:
export INGRESS_HOST=$(minikube ip)
以下命令将服务istio-ingressgateway的类型修改为NodePort,并获取对应的端口:
export INGRESS_PORT=$(kubectl -n istio-system get service istio-ingressgateway -o jsonpath='{.spec.ports[?(@.name=="http2")].nodePort}')
通过执行如下命名部署应用示例Bookinfo:
kubectl label namespace default istio-injection=enabled
kubectl apply -f samples/bookinfo/platform/kube/bookinfo.yaml
kubectl apply -f samples/bookinfo/networking/bookinfo-gateway.yaml
确认相应的Pod启动成功之后,然后在浏览器中输入http://${INGRESS_HOST}:${INGRESS_PORT}/productpage,可以确认Bookinfo应用的运行情况,如图2-3所示。

图2-3 Bookinfo应用示例
如果刷新几次应用的页面,productpage页面中会随机展示reviews服务的不同版本的效果(用红色、黑色的星形,或者没有显示)。reviews服务出现这种情况是因为我们还没有使用Istio来控制版本的路由。在后续章节中可以学习到如何使用Istio的路由能力。