Redux是一种流行且优雅的数据架构,我们在上一章学习了它的相关知识。我们还构建了一个非常基础的应用,结合了Angular组件和Redux的store。
在本章中,我们将进一步展开讲解这些概念,并在其基础之上构建一个更复杂的聊天应用。
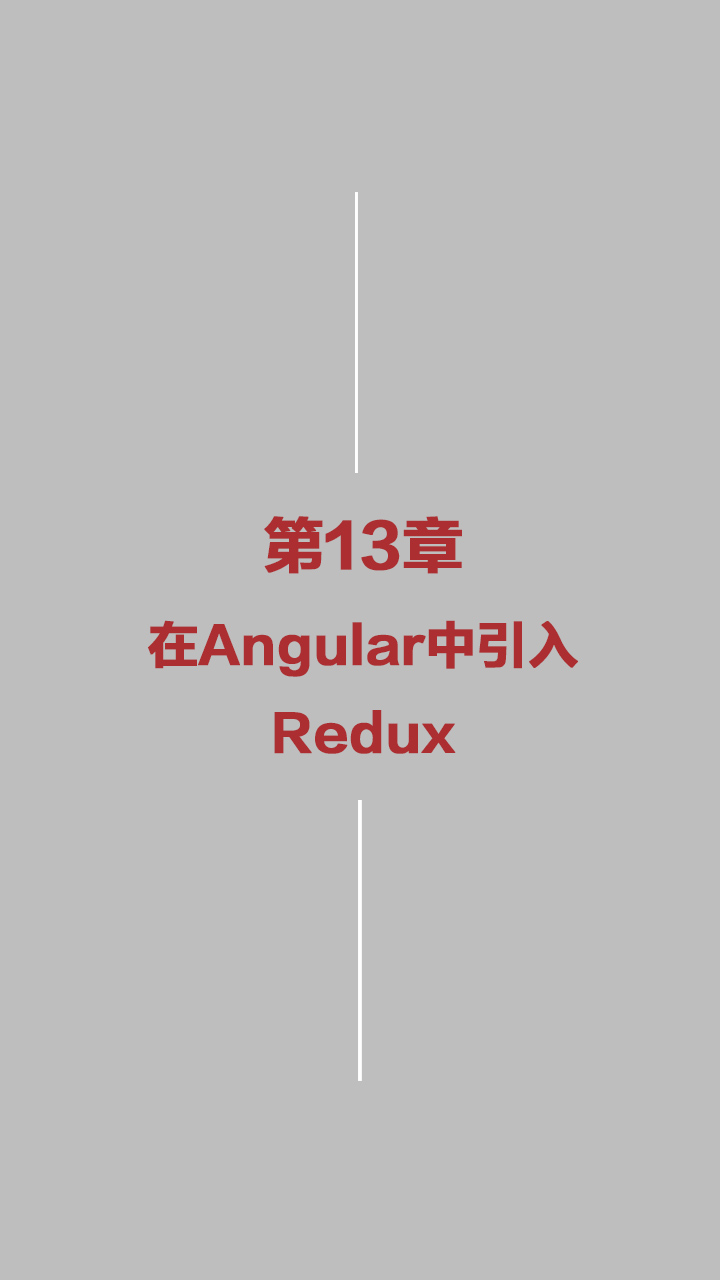
我们最终要构建出的应用如图13-1所示。

图13-1 完成后的聊天应用
在第10章和第11章中,我们用RxJS构建了一个聊天应用。我们打算再构建一个完全相同的应用,但这次改用Redux。这样你就能对比同一个应用在不同数据架构策略下的实现方式了。
你不用为阅读本章的内容而先去阅读第10章和第11章,它们是相互独立的。如果你已经读过了那两章,就可以跳过本章中代码相同的那部分内容(比如,数据模型本身并没有什么变化)。
不过我们确实希望你先读完第12章或至少比较熟悉Redux。
这个应用提供了几个机器人,你可以和它们聊天。先运行这些代码看看:
cd code/redux/angular2-redux-chat
npm install
npm run go
现在在浏览器中打开http://localhost:8080。
 如果上面的链接无法打开,请尝试这个链接:http://localhost:8080/webpack-dev-server/index.html。
 一些Windows用户在这个目录下运行npm
install时可能会遇到问题。如果遇到了,请先确保自己是在Cygwin
一些Windows用户在这个目录下运行npm
install时可能会遇到问题。如果遇到了,请先确保自己是在Cygwin 中运行这些命令行。
在本应用中,你要注意以下几点:
●你可以点击会话(thread)和另一个机器人聊天;
●机器人会根据各自的性格来回复你的消息;
●右上角的未读消息总数会自动同步。
下面来看看本应用是如何构造的。我们有:
●三个顶层Angular组件
●三个数据模型
●两个reducer及其各自的action creator
我们来逐个看看。
13.2.1 组件
将页面分解成三个顶层组件,如图13-2所示。
●ChatNavBar:包含未读消息数。
●ChatThreads:展示一个可点击的会话列表,每个会话都包含最新消息和会话头像。
●ChatWindow:展示当前会话的消息和一个用来发送新消息的输入框。
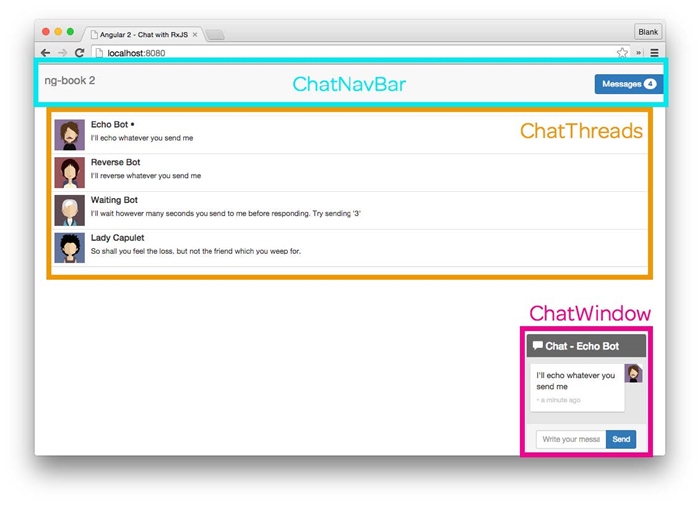
图13-2 Redux聊天应用的顶层组件
13.2.2 数据模型
本应用同样包含三个数据模型,如图13-3所示。
●User:存储聊天参与者的相关信息。
●Message:存储一条单独的信息。
●Thread:存储一组消息的集合以及一些与这次会话有关的其他数据。
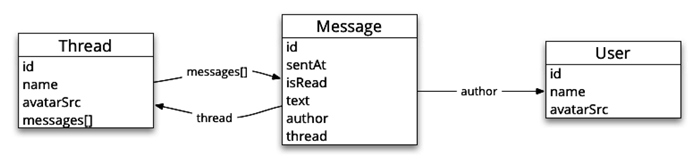
图13-3 Redux聊天应用的数据模型
13.2.3 reducer
本应用有两个reducer。
●UsersReducer:处理当前用户的相关信息。
●ThreadsReducer:处理会话及其相关的消息。
13.2.4 总结
大体来说,本应用的数据架构是这样的:
●所有用户和会话(它保存着该会话的消息列表)相关的信息都保存在中心store之中;
●组件订阅store的变化并显示合适的数据(未读消息数、会话列表和消息列表本身);
●当用户发送一条消息时,组件就会向store中分发一个action。
本章其余部分将深入讲解如何用Angular和Redux来实现此应用。我们先实现数据模型,然后看看如何创建应用的state和reducer,最后实现组件。
我们先从简单的部分开始,看看数据模型。
我们会用interface(接口)来规定每个数据模型的定义。这不是必需的,你也可以使用更复杂一些的对象。尽管如此,带方法的对象可能会改变自己的内部状态,而这会破坏我们努力建立的函数式模型。
也就是说,应用中state的所有变化都只能由reducer发起;state中的对象本身应该是不可变的。
因此,通过把数据模型定义为interface,就可以:
(1)在编译阶段确保我们使用的对象是符合预期格式的;
(2)减少风险,比如不小心往数据模型对象中添加了某个方法而导致意想不到的行为。
13.3.1 User
User接口中有id、name和avatarSrc。
code/redux/angular2-redux-chat/app/ts/models/User.ts
export interface User {
id:string;
name:string;
avatarSrc:string;
isClient?:boolean;
}
我们还有一个布尔值属性isClient(问号表明这个字段是可选的)。当使用本应用的是人而不是机器人时,我们会把User中的该字段设为true。
13.3.2 Thread
同样,Thread也是一个TypeScript接口。
code/redux/angular2-redux-chat/app/ts/models/Thread.ts
export interface Thread {
id:string;
name:string;
avatarSrc:string;
messages:Message[];
}
我们存储了Thread的id、name和avatarSrc,而messages字段中存储的是Message的数组。
13.3.3 Message
Message是第三个也是最后一个数据模型的interface。
code/redux/angular2-redux-chat/app/ts/models/Message.ts
export interface Message {
id?:string;
sentAt?:Date;
isRead?:boolean;
thread?:Thread;
author:User;
text:string;
}
每条消息都包含以下内容。
●id:消息的id。
●sentAt:消息的发送时间。
●isRead:一个布尔值标识,表示消息是否已读。
●author:写这条消息的User。
●text:消息的文本内容。
●thread:对包含这条消息的Thread的引用。
现在有了数据模型,我们再来讨论一下中心state的模型。在前一章中,我们的中心state是一个对象。它有一个counter键,值的类型是一个number。然而这个应用的state就要复杂多了。
下面是应用state的第一部分。
code/redux/angular2-redux-chat/app/ts/reducers/index.ts
export interface AppState {
users:UsersState;
threads:ThreadsState;
}
AppState也是一个interface,它有两个顶级的键:users和threads。这两个键本身是通过两个接口UsersState和ThreadsState来定义的,而这两个接口是在它们各自的reducer文件中定义的。
13.4.1 关于代码布局
在Redux应用中,一种常用的模式是:顶级state中的每个reducer都对应一个顶级的键。这个应用的顶级reducer在reducers/index.ts文件中。
每个reducer都有自己的文件。每个文件中都有如下内容:
●用来描述state树当前分支的interface;
●state树当前分支的初始值;
●reducer本身;
●任何用来查询state树当前分支的选择器——我们还没有讨论过选择器,但是很快就要讲到了。
我们之所以把所有这些截然不同的东西放在一起,是因为它们都是用来处理state树的当前分支的。通过把这些都放在同一个文件中,可以很容易地同时对它们进行重构。
只要愿意,你完全可以使用多级嵌套的布局。如果要分解应用中的大型模块,这是一种很好的方式。
13.4.2 根reducer
讨论到如何拆分reducer,我们来看看根reducer。
code/redux/angular2-redux-chat/app/ts/reducers/index.ts
export interface AppState {
users:UsersState;
threads:ThreadsState;
}
const rootReducer:Reducer<AppState> = combineReducers<AppState>({
users:UsersReducer,
threads:ThreadsReducer
});
注意这里的对称性:UsersReducer作用于users键,而users键的类型是UsersState;ThreadsReducer作用于threads键,而threads键的类型是ThreadsState。
combineReducers让这一切成为可能。它接收一个由键和reducer组成的映射表(map)并返回一个新的reducer,这个新的reducer可以根据这些键进行相应的操作。
当然,我们还没看完AppState的结构,现在继续。
13.4.3 UserState
UsersState保存了currentUser的一个引用。
code/redux/angular2-redux-chat/app/ts/reducers/UsersReducer.ts
export interface UsersState {
currentUser:User;
};
const initialState:UsersState = {
currentUser:null
};
想象一下,state树的这条分支其实可以存储与用户有关的任何信息,比如最后上线的时间、空闲时间等。不过目前这样就足够了。
下面我们会在定义reducer时使用initialState,但此刻只是把当前用户设置为null。
13.4.4 ThreadsState
来看一下ThreadsState。
code/redux/angular2-redux-chat/app/ts/reducers/ThreadsReducer.ts
export interface ThreadsEntities {
[id:string]:Thread;
}
export interface ThreadsState {
ids:string[];
entities:ThreadsEntities;
currentThreadId?:string;
};
const initialState:ThreadsState = {
ids:[],
currentThreadId:null,
entities:{}
};
首先定义了接口ThreadsEntities。它是一个键为会话id,值为会话的映射表。这样我们就能在这个映射表中通过id找到任意一个会话了。
在ThreadsState中还存储了一个名叫ids的数组。它用来存储在entities中能找到的所有会话的id列表。
常用类库normalizr用到了这种策略。它的理念是,一旦标准化了在Redux的state中存储实体的方式,就可以建造辅助类库并清晰地使用它了。使用了normalizr之后,我们就有了大量的选择来让工作更高效,而不必了解每个state树的格式。
我决定不在本章中讲解normalizr,因为还有许多其他东西要学。不过我确实很喜欢在产品级应用中使用normalizr。
另外,normalizr是完全可选的,即使不在本应用中使用也不会导致任何重大的变化。
如果要学习normalizr,请查阅官方文档https://github.com/paularmstrong/normalizr、博客https://medium.com/@mcowpercoles/using-normalizr-js-in-a-redux-store-96ab33991369#.l8ur7ipu6和Redux作者Dan Abramov在Twitter上的转发https://twitter.com/dan_abramov/status/663032263702106112。
我们用currentThreadId保存正在浏览的会话id,目的是了解用户正在浏览的是哪个会话。
把initialState都设置为“空值”。
13.4.5 可视化AppState
Redux DevTools为我们提供了一个Chart视图,它可以让我们检查应用的state。图13-4展示了启动后的所有演示数据。
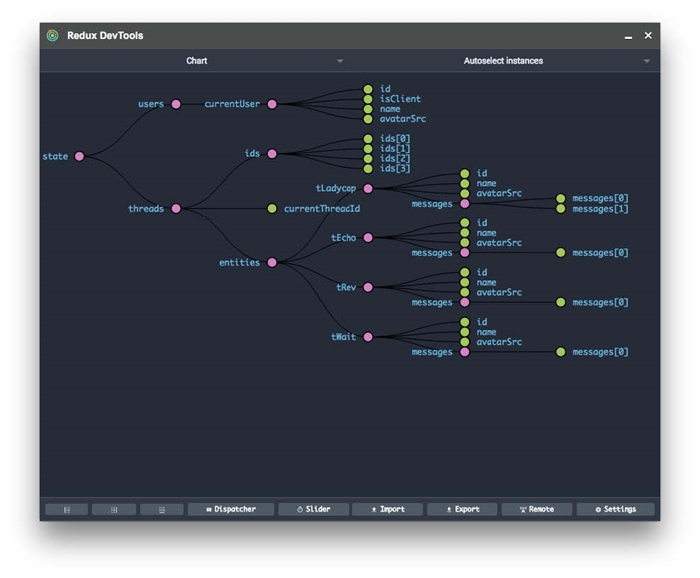
图13-4 Redux聊天应用的状态图
更棒的是可以把鼠标悬停在单个节点上来查看这条数据的各个属性,如图13-5所示。
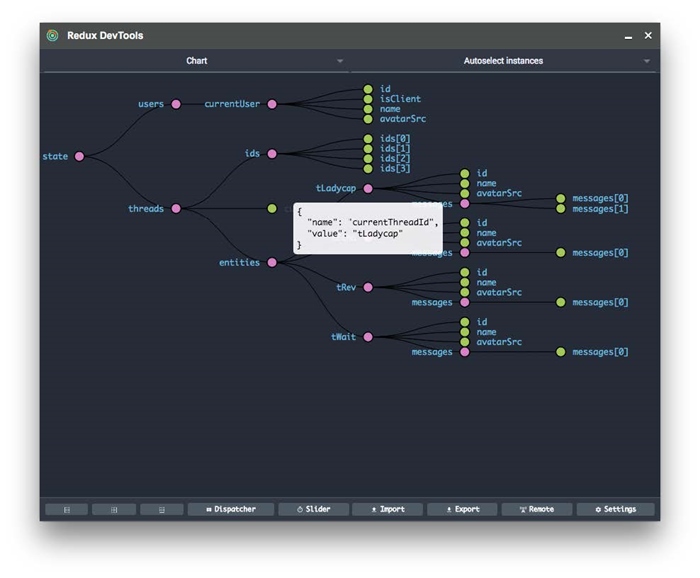
图13-5 查看当前回话
13.5 构建reducer(和action creator)
有了中心state,就可以用reducer来改变它了!
既然reducer要处理action,我们就要知道reducer中action的格式。因此在构建reducer的同时也把action creator构建出来。
13.5.1 设置当前用户的action creator
UserState中存储着当前用户,因此需要一个action来设置当前用户。我们会在actions文件夹中保存这些action文件,并且文件名要和它们对应的reducer保持一致,比如在这个例子中的文件名是UserActions。
code/redux/angular2-redux-chat/app/ts/actions/UserActions.ts
export const SET_CURRENT_USER = '[User] Set Current';
export interface SetCurrentUserAction extends Action {
user:User;
}
export const setCurrentUser:ActionCreator<SetCurrentUserAction> =
(user)=>({
type:SET_CURRENT_USER,
user:user
});
这里定义了const SET_CURRENT_USER。我们将在reducer的switch语句中使用它。
我们还定义了一个新的子接口SetCurrentUserAction,它继承了Action并添加了一个user属性。我们会用user属性表明要把哪个用户作为当前用户。
函数setCurrentUser就是我们的action creator函数。它接收一个user参数并返回一个SetCurrentUserAction。我们要把这个返回值传给reducer的action。
13.5.2 UsersReducer:设置当前用户
现在我们把视线转向UsersReducer。
code/redux/angular2-redux-chat/app/ts/reducers/UsersReducer.ts
export const UsersReducer =
function(state:UsersState = initialState, action:Action):UsersState {
switch(action.type){
case UserActions.SET_CURRENT_USER:
const user:User =(<UserActions.SetCurrentUserAction>action).user;
return {
currentUser:user
};
default:
return state;
}
};
和所有reducer一样,UsersReducer返回一个新的state。在这个例子中,它的类型是UsersState。
接下来对action.type使用switch语句,然后处理UserActions.SET_CURRENT_USER分支。
为了设置当前用户,我们需要从输入的action中获取user。为了做到这一点,首先要把action转换成UserActions.SetCurrentUserAction,然后读取它的.user字段。

这似乎有点奇怪。我们本来已经创建了SetCurrentUserAction,但现在switch语句中使用的却是字符串type,并不是直接使用类型。
实际上,这是受TypeScript所迫。当TypeScript被编译成JavaScript后会丢失接口的元数据。我们也可以尝试使用一些反射机制(装饰器元数据或构造函数等等)来实现。
在分发的时候将SetCurrentUserAction转换成Action,在这里又要转换回去,这样确实不够优雅;但对于这个应用来说,这是处理“多态分发”的一种简便做法。
我们需要返回一个新的UserState。因为UserState只有一个键,所以相应的结果对象只有currentUser键并用所传入action中的user属性作为值。
13.5.3 会话和消息概览
这个应用的核心是会话中的消息。我们需要实现三个action:
(1)往state中添加一个新会话;
(2)往会话中添加消息;
(3)选择一个会话。
我们先来创建一个新会话。
13.5.4 添加新会话的action creator
下面是用来往state中添加新会话的action creator。
code/redux/angular2-redux-chat/app/ts/actions/ThreadActions.ts
export const ADD_THREAD = '[Thread] Add';
export interface AddThreadAction extends Action {
thread:Thread;
}
export const addThread:ActionCreator<AddThreadAction> =
(thread)=>({
type:ADD_THREAD,
thread:thread
});
注意,它在结构上和我们的前一个action creator非常相似。我们定义了一个用在switch语句中的常量ADD_THREAD、一个自定义的Action和一个用来生成Action的action creator addThread。
注意,这里并没有初始化Thread本身,因为这个Thread是作为参数传进来的。
13.5.5 添加新会话的reducer
现在通过处理ADD_THREAD分支来创建ThreadsReducer。
code/redux/angular2-redux-chat/app/ts/reducers/ThreadsReducer.ts
export const ThreadsReducer =
function(state:ThreadsState = initialState, action:Action):ThreadsState {
switch(action.type){
// Adds a new Thread to the list of entities
case ThreadActions.ADD_THREAD:{
const thread =(<ThreadActions.AddThreadAction>action).thread;
if(state.ids.includes(thread.id)){
return state;
}
return {
ids:[ ……state.ids, thread.id ],
currentThreadId:state.currentThreadId,
entities:Object.assign({}, state.entities, {
[thread.id]:thread
})
};
}
// Adds a new Message to a particular Thread
ThreadsReducer处理的是ThreadsState。当处理ADD_THREAD这个action时,我们把action对象类型又转换回了ThreadActions.AddThreadAction并从中取出thread。
接着检查在state.ids的列表中是否包含这个新的thread.id。如果已经有了,那么就不作任何改动,直接返回当前的state。
但如果这个thread是新的,那就要把它添加到当前的state中。
记住,创建一个新的ThreadsState时要格外小心,不要修改旧的state。这个state比我们以前接触过的要复杂得多,但在处理原则上是基本一致的。
我们先把thread.id添加到ids数组中。这里使用了ES6的展开操作符(……)来表明我们想把所有现存的state.ids放入新数组之中并在数组结尾处添加thred.id。
添加一个新会话时currentThreadId并没有改变,所以这里直接返回原来的state.currentThreadId即可。
对于entities,需要记住的是它是一个对象。它的键是每个会话的id字符串,值是这个会话本身。这里使用Object.assign来创建一个新对象,新对象中包含了老的state.entities和一个新的thread对象。
每次进行修改时都要小心翼翼地复制这些对象是不是让你觉得很烦?别人也都这么想!事实上,这样做会很容易意外修改原始数据。
这也就是出现Immutable.js的原因了。和Redux一起使用Immutable.js通常就是出于这个目的。Immutable会帮我们处理好这些原本需要小心进行的更新。
我建议你查看Immutable.js,看看它对写reducer是否更合适。
现在就可以把新会话添加到中心state里了!
13.5.6 添加新消息的action creator
有了会话,我们就可以开始往里面添加消息了。
为添加消息定义一个新的action。
code/redux/angular2-redux-chat/app/ts/actions/ThreadActions.ts
export const ADD_MESSAGE = '[Thread] Add Message';
export interface AddMessageAction extends Action {
thread:Thread;
message:Message;
}
AddMessageAction往会话中添加一条消息。
下面是添加新消息的action creator。
code/redux/angular2-redux-chat/app/ts/actions/ThreadActions.ts
export const addMessage:ActionCreator<AddMessageAction> =
(thread:Thread, messageArgs:Message):AddMessageAction => {
const defaults = {
id:uuid(),
sentAt:new Date(),
isRead:false,
thread:thread
};
const message:Message = Object.assign({}, defaults, messageArgs);
return {
type:ADD_MESSAGE,
thread:thread,
message:message
};
};
addMessage这个action creator接收一个thread和一个准备加工成消息的对象。注意,这里保留了一个defaults的列表,目的是把创建id、设置时间戳和设置isRead状态等操作封装起来。对于发送信息的人来说,这样就完全不用关心UUID的具体格式是什么了。
如果用户已经事先用UUID类库创建好了自带id的消息,当用户发送这条消息时,我们也会将它保存起来。为了实现这种默认行为,先把messageArgs合并到defaults之中,再合并到一个新的对象中。
最后,我们返回了带有thread和新的message且类型为ADD_MESSAGE的action。
13.5.7 添加新消息的reducer
现在我们要在ThreadsReducer中添加ADD_MESSAGE的处理器。要添加一条新消息,我们就要获得这个会话,然后把消息添加到这个会话中。
这里还有微妙的一点要处理:如果该thread是当前会话,那就要将这条消息标记为已读。
用户永远都会有一个会话是当前会话,也就是他们正在查看的会话。我们的意思是,如果把一条新消息添加到了当前会话中,那么它就会被自动标记为已读。
code/redux/angular2-redux-chat/app/ts/reducers/ThreadsReducer.ts
case ThreadActions.ADD_MESSAGE:{
const thread =(<ThreadActions.AddMessageAction>action).thread;
const message =(<ThreadActions.AddMessageAction>action).message;
// special case:if the message being added is in the current thread, then
// mark it as read
const isRead = message.thread.id === state.currentThreadId ?
true:message.isRead;
const newMessage = Object.assign({}, message, { isRead:isRead });
// grab the old thraed from entities
const oldThread = state.entities[thread.id];
// create a new thread which has our newMessage
const newThread = Object.assign({}, oldThread, {
messages:[……oldThread.messages, newMessage]
});
return {
ids:state.ids, // unchanged
currentThreadId:state.currentThreadId, // unchanged
entities:Object.assign({}, state.entities, {
[thread.id]:newThread
})
};
}
// Select a particular thread in the UI
这段代码有点长,因为我们要小心地避免修改原来的会话,但它大体上和我们以前所做的没什么不同。
首先,提取出thread和message。
如果这条消息属于当前会话(接下来就会看到如何设置当前会话),我们就把它标记为已读。
然后,我们抓取oldThread并把newMessage追加到旧的messages数组,以创建newThread。
最后,我们返回新的ThreadsState。当前的会话ids列表和currentThreadId在添加一条新消息时都没有变,所以这里直接使用原有值。唯一改变的就是我们用newThread更新了entities。
现在来实现我们数据骨架的最后一部分:选择会话。
13.5.8 选择会话的action creator
用户可以同时进行多个聊天会话,但是只有一个聊天窗口(也就是用户可以阅读和发送消息的地方)。当用户点击了一个会话,我们就要在聊天窗口中展示这个会话中的消息,如图13-6所示。
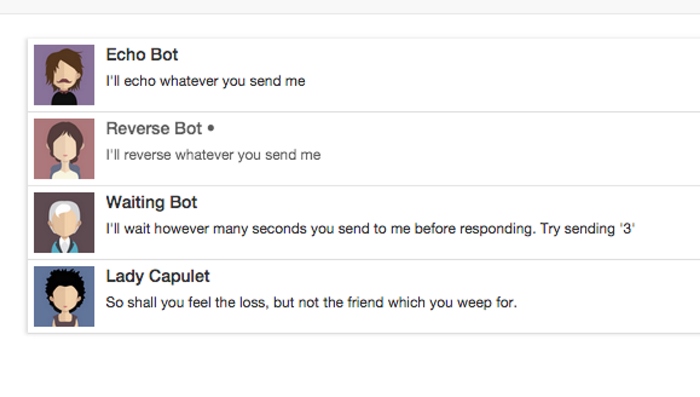
图13-6 选择一个会话
我们需要记录哪个会话是当前选中的会话。要做到这一点,需要使用ThreadsState中的currentThreadId属性。
我们来创建它的action。
code/redux/angular2-redux-chat/app/ts/actions/ThreadActions.ts
export const SELECT_THREAD = '[Thread] Select';
export interface SelectThreadAction extends Action {
thread:Thread;
}
export const selectThread:ActionCreator<SelectThreadAction> =
(thread)=>({
type:SELECT_THREAD,
thread:thread
});
这个action中并没有引入新概念,只有新的动作类型SELECT_THREAD和当前选中并作为参数传入的thread。
13.5.9 选择会话的reducer
选择一个thread需要做两件事:
(1)把currentThreadId设置为选中thread的id;
(2)把这个thread中的所有消息标记为已读。
下面是这个reducer的代码。
code/redux/angular2-redux-chat/app/ts/reducers/ThreadsReducer.ts
case ThreadActions.SELECT_THREAD:{
const thread =(<ThreadActions.SelectThreadAction>action).thread;
const oldThread = state.entities[thread.id];
// mark the messages as read
const newMessages = oldThread.messages.map(
(message)=> Object.assign({}, message, { isRead:true }));
// give them to this new thread
const newThread = Object.assign({}, oldThread, {
messages:newMessages
});
return {
ids:state.ids,
currentThreadId:thread.id,
entities:Object.assign({}, state.entities, {
[thread.id]:newThread
})
};
}
default:
return state;
}
};
首先获取要选择的thread然后使用thread.id从state中得到当前会话的值。
这是个防御型策略。为什么不直接使用传进来的thread呢?对于一些应用来说这也许是正确的设计决策。但在这个例子中,需要通过读取state.entities中会话的最后一个已知值来使thread免受外部修改。
接下来,我们创建所有旧消息的副本并把它们全部设置为isRead:true。然后把新的已读消息列表赋给newThread。
最后,我们返回新的ThreadsState。
13.5.10 reducer总结
完成了!这些就是搭建数据架构的骨架所需的一切。
回顾一下,UsersReducer负责维护当前用户,而ThreadsReducer则负责管理:
●会话列表
●会话中的消息列表
●当前选中的会话
我们可以从这些数据中拿到所需的一切了(比如未读消息数)。
接下来就把它们和组件连接在一起!
如前所述,页面会被分解成三个顶层组件,如图13-7所示。
●ChatNavBar:包含未读消息数。
●ChatThreads:展示一个可点击的会话列表,每个会话包含最后一条消息和会话头像。
●ChatWindow:展示当前会话的消息和一个用来发送新消息的输入框。

图13-7 Redux聊天应用的顶层组件
我们要像上一章一样启动本应用。在应用的最上层,我们初始化Redux store并通过Angular的依赖注入系统来提供它。(如果觉得陌生,请重新阅读上一章。)
code/redux/angular2-redux-chat/app/ts/app.ts
let store:Store<AppState> = createStore<AppState>(
reducer,
compose(devtools)
);
@NgModule({
declarations:[
ChatApp,
ChatPage,
ChatThreads,
ChatNavBar,
ChatWindow,
ChatThread,
ChatMessage,
FromNowPipe
],
imports:[
BrowserModule,
FormsModule
],
bootstrap:[ ChatApp ],
providers:[
{ provide:AppStore, useFactory:()=> store }
]
})
class ChatAppModule {}
platformBrowserDynamic().bootstrapModule(ChatAppModule)
13.6.1 顶层组件ChatApp
ChatApp是顶层组件,只负责渲染ChatPage组件。
code/redux/angular2-redux-chat/app/ts/app.ts
@Component({
selector:'chat-app',
template:`
<div>
<chat-page></chat-page>
</div>
`
})
class ChatApp {
constructor(@Inject(AppStore)private store:Store<AppState>){
ChatExampleData(store);
}
}
这个应用中机器人的数据来自客户端而不是服务器端。ChatExampleData()函数为应用设置了初始数据。我们不会在本书中具体解释这段代码,如果你想了解它的工作细节,可以随时查阅源代码。
我们没有在这个应用中使用路由。如果要用的话,可以把与路由相关的内容放到应用的顶层组件之中。现在只创建ChatPage组件来渲染应用的主体部分。
这个应用中没有其他页面,但为每个页面分配一个组件仍然是个好主意,毕竟将来万一还要添加其他页面呢。
13.6.2 ChatPage
聊天页面会渲染三个主要组件:
●ChatNavBar
●ChatThreads
●ChatWindow
下面是其代码。
code/redux/angular2-redux-chat/app/ts/pages/ChatPage.ts
@Component({
selector:'chat-page',
template:`
<div>
<chat-nav-bar></chat-nav-bar>
<div class="container">
<chat-threads></chat-threads>
<chat-window></chat-window>
</div>
</div>
`
})
export default class ChatPage {
}
我们在这个应用中使用的是一种叫作容器型组件的设计模式。这三个组件都是容器型组件。下面就来解释一下。
13.6.3 容器型组件与展示型组件
如果数据散布于所有组件中,那么这个应用就会很难理解。然而,我们的应用是动态的,组件需要运行时的数据来填充,也需要响应用户的交互。
缓解这种冲突的模式之一就是区分展示型组件与容器型组件的概念。具体来说是这样的:
(1)要让与外部数据源(例如API、Redux store、Cookies等)交互的组件尽可能少;
(2)要有意识地将数据访问放在容器型组件之中;
(3)对于纯“功能性”的展示型组件,要求它的所有属性(输入和输出)都由容器型组件来管理。
这种设计的好处在于展示型组件的行为是可预测的。它们可以复用,因为它们只关心自己用到的那部分数据,从不对整体的数据架构作出任何假设。
即使不考虑可复用性,其可预测性也是一个优点。对于相同的输入,它们总是会给出相同的输出(比如用相同的方式渲染)。
仔细想想,你会发现要求reducer必须是纯函数和要求展示型组件必须是“纯组件”背后的哲学是一样的。
如果整个应用全都是展示型组件,那是最理想的。但现实世界中的数据是杂乱、不断变化的,所以我们可以试着把用来适应真实世界的各种复杂数据封装到容器型组件中。
如果你是高级程序员,可能会发现在MVC和容器/展示型组件之间存在着一种不太准确的比喻。也就是说,展示型组件类似于所传入数据的“视图”,而容器型组件则类似于“控制器”,它接收“数据模型”(应用其他部分的数据)并在进行适配之后传给展示型组件。
但如果你还是编程界的新兵,那就先别试图理解“Angular组件本身就是视图和控制器”这种比喻了。
在这个应用中,容器型组件就是那些和store交互的组件。这表示容器型组件符合下列三种特征:
(1)从store中读取数据;
(2)订阅store的变化;
(3)向store中分发action。
这里的三个主要组件都是容器型组件,而它们所包含的组件都是展示型的(也就是功能性的/纯粹的/不和store交互的)。
接下来构建第一个容器型组件:导航条。
导航条中要显示当前用户的未读消息数,如图13-8所示。

图13-8 ChatNavBar组件中的未读数
试验未读消息数量最好的办法是使用等待机器人(Waiting
Bot)。如何你还没有试过,尝试发消息“3”给等待机器人,然后切换到其他聊天窗口。等待机器人会等3秒再给你回复消息,这样你就会看到未读消息数量的增长。
先来看看组件代码。
code/redux/angular2-redux-chat/app/ts/containers/ChatNavBar.ts
@Component({
selector:'chat-nav-bar',
template:`
<nav class="navbar navbar-default">
<div class="container-fluid">
<div class="navbar-header">
<a class="navbar-brand" href="https://ng-book.com/2">
<img src="${require('images/logos/ng-book-2-minibook.png')}"/>
ng-book 2
</a>
</div>
<p class="navbar-text navbar-right">
<button class="btn btn-primary" type="button">
Messages <span class="badge">{{ unreadMessagesCount }}</span>
</button>
</p>
</div>
</nav>
`
})
export default class ChatNavBar {
unreadMessagesCount:number;
constructor(@Inject(AppStore)private store:Store<AppState>){
store.subscribe(()=> this.updateState());
this.updateState();
}
updateState(){
this.unreadMessagesCount = getUnreadMessagesCount(this.store.getState());
}
}
模板为我们提供了DOM结构和渲染导航条所需的CSS(这些CSS类来自CSS框架Bootstrap)。
在这个模板中,我们唯一要显示的变量是unreadMessagesCount。
ChatNavBar组件中的unreadMessagesCount是一个实例变量。它会被设置成所有会话的未读消息总数。
注意,我们在constructor中做了三件事:
(1)注入了store;
(2)订阅了store中的任何变化;
(3)调用了this.updateState()。
我们在subscribe后调用了this.updateState(),因为要确保组件使用最新数据进行初始化。subscribe只会在组件初始化之后state数据发生变化的时候调用。
updateState()是最有意思的函数——我们把unreadMessagesCount设置为getUnreadMessagesCount函数的返回值。getUnreadMessagesCount是什么?它从哪里来?
getUnreadMessagesCount是一个名叫选择器(selector)的新概念。
13.7.1 Redux选择器
思考一下AppState,我们该如何获取未读消息总数呢?像下面这样如何:
// get the state
let state = this.store.getState();
// get the threads state
let threadsState = state.threads;
// get the entities from the threads
let threadsEntities = threadsState.entities;
// get all of the threads from state
let allThreads = Object.keys(threadsEntities)
.map((threadId)=> entities[threadId]);
// iterate over all threads and ……
let unreadCount = allThreads.reduce(
(unreadCount:number, thread:Thread)=> {
// foreach message in that thread
thread.messages.forEach((message:Message)=> {
if(!message.isRead){
// if it's unread, increment unread count
++unreadCount;
}
});
return unreadCount;
},
0);
我们应该把这段逻辑放在ChatNavBar组件中吗?如果这么做的话,会有如下两个问题。
(1)这一大块代码深深地渗透到了AppState中。更好的方法是把这段逻辑移到所涉及的state之后。
(2)如果应用的其他地方需要显示未读消息总数呢?如何共享这段逻辑?
选择器背后的思想可用来解决这些问题:
选择器是函数,它接收部分state并返回一个值。
我们来看看如何创建选择器。
13.7.2 会话选择器
先从简单的部分开始。假设我们要在AppState中获取ThreadsState。
code/redux/angular2-redux-chat/app/ts/reducers/ThreadsReducer.ts
export const getThreadsState =(state):ThreadsState => state.threads;
相当简单,对不对?只要给定了顶层的AppState,就可以通过state.threads找到ThreadsState。
如果我们要获取当前会话,可以这样做:
const getCurrentThread =(state:AppState):Thread => {
let currentThreadId = state.threads.currentThreadId;
return state.threads.entities[currentThreadId];
}
对于这个小例子来说,这样的选择器就可以胜任。值得考虑的是,如何随着应用的增长让选择器更具可维护性。如果能用选择器来查询其他选择器就好了。如果一个选择器能指定多个其他选择器作为自己的依赖就更好了。
这些正是reselect类库提供的。利用reselect,我们可以创建更小、更专注的选择器,还能结合它们实现更大的功能。
下面来看看如何使用reselect提供的createSelector方法获取当前会话。
code/redux/angular2-redux-chat/app/ts/reducers/ThreadsReducer.ts
export const getThreadsEntities = createSelector(
getThreadsState,
(state:ThreadsState)=> state.entities);
先来写一个getThreadsEntities选择器。getThreadsEntities使用createSelector并传入两个参数:
(1)之前定义的选择器getThreadsState;
(2)一个回调函数,用于接收getThreadsState选择器的返回值,并返回我们要选取的值。
这里只获取了state.entities,看起来似乎有点浪费,但它为我们建立了可维护性更强的选择器。现在看看如何用createSelector创建getCurrentThread。
code/redux/angular2-redux-chat/app/ts/reducers/ThreadsReducer.ts
export const getCurrentThread = createSelector(
getThreadsEntities,
getThreadsState,
(entities:ThreadsEntities, state:ThreadsState)=>
entities[state.currentThreadId]);
注意,这里引用了两个选择器作为依赖:getThreadsEntities和getThreadsState。这些选择器被解析后就会变成回调函数的参数。我们可以把它们组合起来返回当前选中的会话。
13.7.3 未读消息总数选择器
现在我们已经理解了选择器的工作原理,接着就来创建一个选择器以获取未读消息的数量。如果看过前面获取未读消息总数的首次尝试,你会发现每个变量都可以被替换成它们自己的选择器(getThreadsState、getThreadsEntities等)。
下面是用来获取所有Thread的选择器。
code/redux/angular2-redux-chat/app/ts/reducers/ThreadsReducer.ts
export const getAllThreads = createSelector(
getThreadsEntities,
(entities:ThreadsEntities)=> Object.keys(entities)
.map((threadId)=> entities[threadId]));
拿到所有会话之后,我们就可以知道所有会话中的未读消息总数。
code/redux/angular2-redux-chat/app/ts/reducers/ThreadsReducer.ts
export const getUnreadMessagesCount = createSelector(
getAllThreads,
(threads:Thread[])=> threads.reduce(
(unreadCount:number, thread:Thread)=> {
thread.messages.forEach((message:Message)=> {
if(!message.isRead){
++unreadCount;
}
});
return unreadCount;
},
0));
有了这个选择器,我们就可以在ChatNavBar组件中(以及应用中任何需要的地方)获取到未读消息的数量。
接下来在ChatThreads组件中构建会话列表,如图13-9所示。
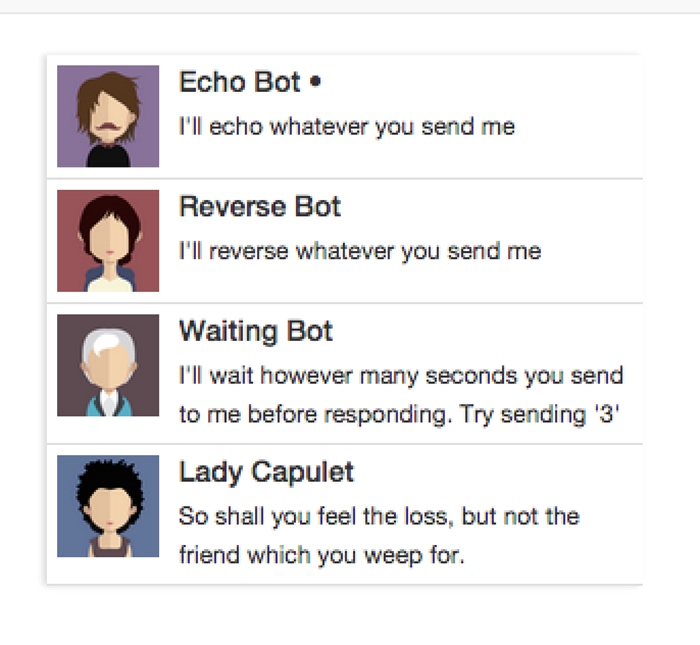
图13-9 按时间排序的会话列表
13.8.1 ChatThreads控制器
在查看ChatThreads组件的模板之前,我们先来看看组件的控制器。
code/redux/angular2-redux-chat/app/ts/containers/ChatThreads.ts
export default class ChatThreads {
threads:Thread[];
currentThreadId:string;
constructor(@Inject(AppStore)private store:Store<AppState>){
store.subscribe(()=> this.updateState());
this.updateState();
}
updateState(){
let state = this.store.getState();
// Store the threads list
this.threads = getAllThreads(state);
// We want to mark the current thread as selected,
// so we store the currentThreadId as a value
this.currentThreadId = getCurrentThread(state).id;
}
handleThreadClicked(thread:Thread){
this.store.dispatch(ThreadActions.selectThread(thread));
}
}
在这个组件中存储了两个实例变量。
●threads:会话列表。
●currentThreadId:用户正在操作的当前会话。
在constructor中保存了一个Redux store的引用并订阅更新。一旦store发生变化,就调用updateState()。
updateState()会保持实例变量与Redux store同步。注意我们正在用的这两个选择器:
●getAllThreads
●getCurrentThread
这样就可以保持它们各自的实例变量总是最新的。
这里引入了一个新概念:事件处理器handleThreadClicked。handleThreadClicked会分发selectThread这个action。当点击一个会话时,我们就告诉store把这个新会话设为所选会话并且应用的其余部分也应该依次更新。
13.8.2 ChatThreads的template
我们来看一下ChatThreads组件的template及其配置。
code/redux/angular2-redux-chat/app/ts/containers/ChatThreads.ts
*/
@Component({
selector:'chat-threads',
template:`
<!—— conversations ——>
<div class="row">
<div class="conversation-wrap">
<chat-thread
*ngFor="let thread of threads"
[thread]="thread"
[selected]="thread.id === currentThreadId"
(onThreadSelected)="handleThreadClicked($event)">
</chat-thread>
</div>
</div>
`
我们在模板中使用ngFor来遍历threads。我们还用了一个叫作ChatThread的新组件来渲染单个会话。
ChatThread是一个展示型组件。在ChatThread中,我们既不能使用store,也不能读取数据和分发action。反之,我们要通过inputs(输入参数)来传入该组件所需的一切,并通过outputs(输出参数)来处理任何交互。
接着我们会介绍ChatThread的实现,但先来看看这个模板中的输入和输出。
●使用单个thread变量作为输入属性[thread];
●对于输入属性[selected],我们传入一个布尔值来表明这个会话(thread.id)是否是当前会话(currentThreadId);
●如果会话被点击,就发出输出事件(onThreadSelected)。这时就会调用handleThreadClicked()(它会向store中分发选择会话的事件)。
我们再来研究一下ChatThread组件。
ChatThread组件用来显示会话列表中一个单独的会话。记住ChatThread是展示型组件,它只会操作直接给它的那些数据。
因为它是一个展示型组件,所以我们将它放在app/ts/components文件夹中。
下面是组件控制器的代码。
code/redux/angular2-redux-chat/app/ts/components/ChatThread.ts
export default class ChatThread {
thread:Thread;
selected:boolean;
onThreadSelected:EventEmitter<Thread>;
constructor(){
this.onThreadSelected = new EventEmitter<Thread>();
}
clicked(event:any):void {
this.onThreadSelected.emit(this.thread);
event.preventDefault();
}
}
这里的看点是onThreadSelected这个EventEmitter。如果你还没怎么用过EventEmitter,可以把它当作观察者模式的一种实现。我们把它作为这个组件的“输出通道”——想发送数据时就调用onThreadSelected.emit方法,把想要发送的数据传进去。
在这个例子中,我们想把当前会话作为参数传给EventEmitter。当点击这个元素时,我们就会调用onThreadSelected.emit(this.thread),它会触发父级组件(ChatThreads)中的回调函数。
ChatThread的@Component和template
下面是@Component注解和template的代码。
code/redux/angular2-redux-chat/app/ts/components/ChatThread.ts
@Component({
inputs:['thread', 'selected'],
selector:'chat-thread',
outputs:['onThreadSelected'],
template:`
<div class="media conversation">
<div class="pull-left">
<img class="media-object avatar"
src="{{thread.avatarSrc}}">
</div>
<div class="media-body">
<h5 class="media-heading contact-name">{{thread.name}}
<span *ngIf="selected">•</span>
</h5>
<small class="message-preview">
{{thread.messages[thread.messages.length - 1].text}}
</small>
</div>
<a(click)="clicked($event)" class="div-link">Select</a>
</div>
`
这里把thread和selected指定为inputs属性,把onThreadSelected指定为outputs属性。
注意,视图中使用了一些直接的绑定,比如{{thread.avatarSrc}}和{{thread.name}}。在class为message-preview的标签中有如下代码:
{{ thread.messages[thread.messages.length - 1].text }}
它会获取会话中的最后一条消息并显示消息的文本,目的是在每个会话中显示最新消息的预览。
我们还用了*ngIf,会对选中的会话显示•符号。
最后,我们绑定了(click)事件来调用clicked()处理器。注意,我们在调用clicked时传入了参数$event。这是Angular提供的一个用来描述事件的特殊变量。我们通过在clicked处理器中调用event.preventDefault();来使用它。这样可以确保我们不会跳转到其他页面。
ChatWindow是这个应用中最复杂的组件(如图13-10所示)。我们一步一步来完成它。
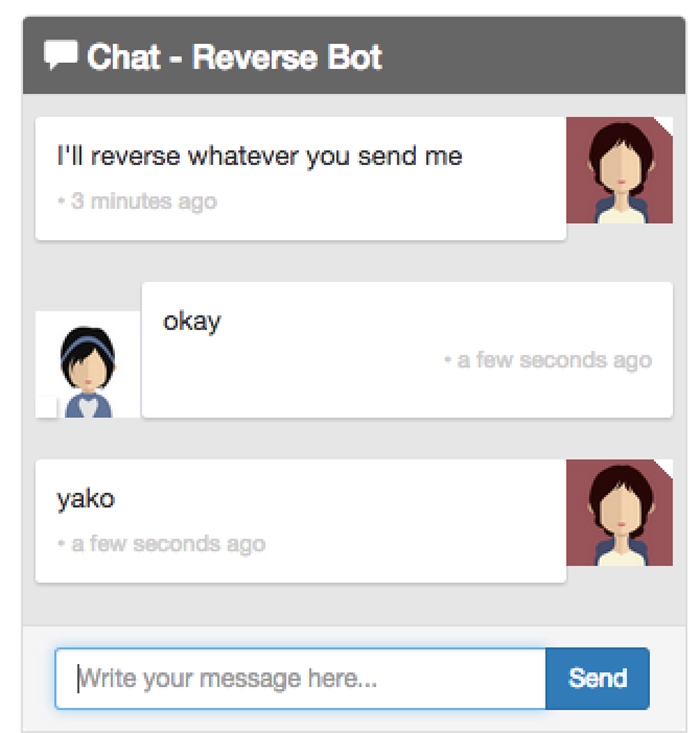
图13-10 聊天窗口
ChatWindow类有三个属性:currentThread(其中包括messages)、draftMessage和currentUser。
code/redux/angular2-redux-chat/app/ts/containers/ChatWindow.ts
export default class ChatWindow {
currentThread:Thread;
draftMessage:{ text:string };
currentUser:User;
图13-11表明了每一个属性在何处使用。
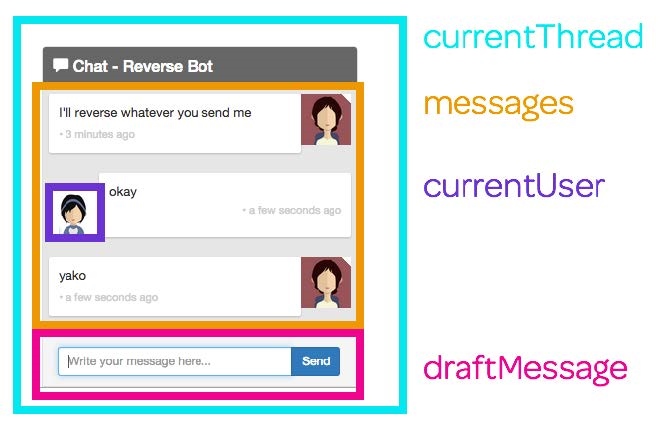
图13-11 聊天窗口的属性
我们在constructor中注入了两样东西。
code/redux/angular2-redux-chat/app/ts/containers/ChatWindow.ts
constructor(@Inject(AppStore)private store:Store<AppState>,
private el:ElementRef){
store.subscribe(()=> this.updateState());
this.updateState();
this.draftMessage = { text:'' };
}
第一个是Redux store,第二个是el。el是一个ElementRef,可以用来获取宿主DOM元素。当创建和接收新消息的时候,我们会借助它来让聊天窗口滚动到底部。
我们在构造函数中订阅了store,就像在其他容器型组件中所做的那样。
接着要做的是设置一个默认的draftMessage,它的text属性是一个空字符串。我们会使用draftMessage来记录用户在输入框中输入的消息。
13.10.1 ChatWindow的updateState()
当store改变时,我们会更新该组件的实例变量。
code/redux/angular2-redux-chat/app/ts/containers/ChatWindow.ts
updateState(){
let state = this.store.getState();
this.currentThread = getCurrentThread(state);
this.currentUser = getCurrentUser(state);
this.scrollToBottom();
}
我们存储了当前会话和当前用户。如果来了新消息,我们希望滚动到窗口的底部。在这里调用scrollToBottom有点粗糙,但这种简单的方法可以保证在有新消息时(或用户切换到一个新会话中时)用户不需要每次都手动滚动窗口。
13.10.2 ChatWindow的scrollToBottom()
为了滚动到聊天窗口的底部,我们将使用保存在构造函数中的类型为ElementRef的el。要让这个元素滚动,就要设置宿主元素的scrollTop属性。
code/redux/angular2-redux-chat/app/ts/containers/ChatWindow.ts
scrollToBottom():void {
let scrollPane:any = this.el
.nativeElement.querySelector('.msg-container-base');
if(scrollPane){
setTimeout(()=> scrollPane.scrollTop = scrollPane.scrollHeight);
}
}

为什么使用setTimeout?
如果我们得到新消息时立即调用scrollToBottom,那么滚动到底部的动作就是在新消息渲染完成之前执行的。使用setTimeout可以告诉JavaScript我们要在当前执行队列完成后再运行这个函数。该函数会在组件渲染完成之后执行,这正是我们想要的效果。
13.10.3 ChatWindow的sendMessage
如果我们要发送一条新消息,就要先拿到:
●当前会话
●当前用户
●草稿消息的文本
然后向store中分发一个新的addMessage action。下面是其代码。
code/redux/angular2-redux-chat/app/ts/containers/ChatWindow.ts
sendMessage():void {
this.store.dispatch(ThreadActions.addMessage(
this.currentThread,
{
author:this.currentUser,
isRead:true,
text:this.draftMessage.text
}
));
this.draftMessage = { text:'' };
}
sendMessage函数接收draftMessage参数并用组件的属性来设置author和thread。每条已发送的信息其实都已经被读过了(因为是我们写的),所以将其标记为已读。
分发这条消息之后,创建一个新的Message对象并把它赋给this.draftMessage。这会清空输入框。创建一个新对象可以确保我们不会改变已经发送给store的消息。
13.10.4 ChatWindow的onEnter
在视图中,我们希望在下面两种场景发送消息:
(1)用户点击Send按钮;
(2)用户敲击回车键。
我们定义一个函数来处理这两种事件。
code/redux/angular2-redux-chat/app/ts/containers/ChatWindow.ts
onEnter(event:any):void {
this.sendMessage();
event.preventDefault();
}
我们创建onEnter事件处理器并把sendMessage作为一个单独的函数,这是因为onEnter要接收一个参数event并调用event.preventDefault()。这种方式下我们还可以在响应浏览器事件之外的场景下调用sendMessage。在这个例子中,我们并没有真的在其他场景下调用sendMessage,但我发现把“真正干活的”函数从事件处理器中独立出来会更好。
否则,sendMessage函数就会:(1)要求必须传入一个事件对象;(2)处理该事件对象。但是这样一来它的关注点就太多了。
现在已经处理好了控制器的代码,让我们来看看template。
13.10.5 ChatWindow的template
我们先从面板(panel)的起始标签开始,并且在头部显示聊天的名称。
code/redux/angular2-redux-chat/app/ts/containers/ChatWindow.ts
@Component({
selector:'chat-window',
template:`
<div class="chat-window-container">
<div class="chat-window">
<div class="panel-container">
<div class="panel panel-default">
<div class="panel-heading top-bar">
<div class="panel-title-container">
<h3 class="panel-title">
<span class="glyphicon glyphicon-comment"></span>
Chat - {{currentThread.name}}
</h3>
</div>
<div class="panel-buttons-container" >
<!—— you could put minimize or close buttons here ——>
</div>
</div>
<div class="panel-body msg-container-base">
接下来显示消息列表。这里用ngFor遍历消息列表。我们稍后会讲解单个chat-message组件。
code/redux/angular2-redux-chat/app/ts/containers/ChatWindow.ts
<chat-message
*ngFor="let message of currentThread.messages"
[message]="message">
</chat-message>
</div>
<div class="panel-footer">
最后是消息输入框和各个结束标签。
code/redux/angular2-redux-chat/app/ts/containers/ChatWindow.ts
<div class="input-group">
<input type="text"
class="chat-input"
placeholder="Write your message here……"
(keydown.enter)="onEnter($event)"
[(ngModel)]="draftMessage.text" />
<span class="input-group-btn">
<button class="btn-chat"
(click)="onEnter($event)"
>Send</button>
</span>
</div>
</div>
</div>
</div>
</div>
</div>
`
})
export default class ChatWindow {
消息输入框是视图中最有意思的部分,我们来看看其中两个有趣的属性:(keydown.enter)和[(ngModel)]。
13.10.6 处理键盘动作
Angular提供了一种简明的方式来处理键盘动作:在元素上绑定事件。在这个例子中,我们绑定了keydown.enter。这表示如果用户按下回车键,就会调用表达式里的函数onEnter($event)。
code/redux/angular2-redux-chat/app/ts/containers/ChatWindow.ts
class="chat-input"
placeholder="Write your message here……"
(keydown.enter)="onEnter($event)"
[(ngModel)]="draftMessage.text" />
<span class="input-group-btn">
13.10.7 使用ngModel
如前所述,Angular并没有像AngularJS那样把双向绑定作为数据架构的核心。特别是当我们使用Redux的时候,它是完全的单向数据流。
然而在组件及其视图之间进行双向绑定是非常有用的。只要把双向绑定的坏处限制在组件之中,保持组件属性和视图的同步是很方便的。
对于这个例子,我们在输入框的值和draftMessage.text之间建立了一个双向绑定。如果在输入框中输入文字,draftMessage.text就会自动设置为输入的文字。同样,如果在代码中更新draftMessage.text,那么视图中输入框的值也会随之改变。
13.10.8 点击Send按钮
在Send按钮上将(click)属性绑定到组件中的onEnter函数。
code/redux/angular2-redux-chat/app/ts/containers/ChatWindow.ts
(click)="onEnter($event)"
>Send</button>
</span>
我们使用同一个onEnter函数来处理本事件。也就是说,点击这个按钮和按回车键都可以发送消息。
我们没有把渲染单个消息的代码都放到ChatWindow组件中,而是创建了另一个展示型组件ChatMessage。
提示:如果你发现自己正在使用ngFor,那就表示你该创建一个新组件了。
每条消息都是通过ChatMessage组件渲染的,如图13-12所示。
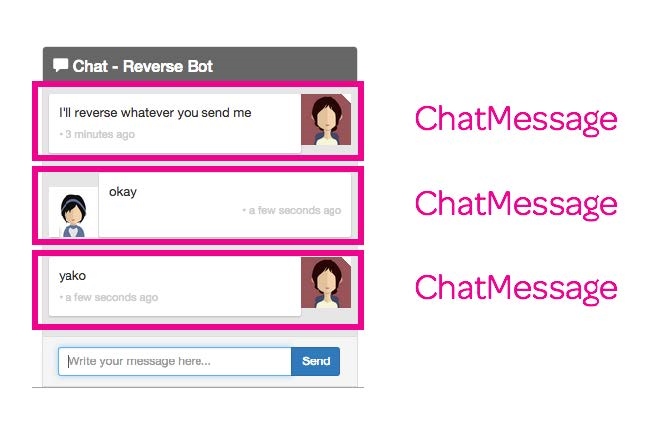
图13-12 ChatMessage组件
该组件相对简明,其主要逻辑是根据消息是否由当前用户所创建来渲染出略有不同的视图。如果该消息不是当前用户创建的,就认为消息是收到的(incoming)。
13.11.1 设置incoming属性
记住,每个ChatMessage组件都属于一条Message。因此,要在ngOnInit方法里订阅currentUser流并根据这条Message是否由当前用户创建来设置incoming。
code/redux/angular2-redux-chat/app/ts/components/ChatMessage.ts
export default class ChatMessage implements OnInit {
message:Message;
incoming:boolean;
ngOnInit():void {
this.incoming =!this.message.author.isClient;
}
}
13.11.2 ChatMessage的template
在template中有两点值得注意:
(1)FromNowPipe管道
(2)[ngClass]属性
先来看其代码。
code/redux/angular2-redux-chat/app/ts/components/ChatMessage.ts
*/
@Component({
inputs:['message'],
selector:'chat-message',
template:`
<div class="msg-container"
[ngClass]="{'base-sent':!incoming, 'base-receive':incoming}">
<div class="avatar"
*ngIf="!incoming">
<img src="{{message.author.avatarSrc}}">
</div>
<div class="messages"
[ngClass]="{'msg-sent':!incoming, 'msg-receive':incoming}">
<p>{{message.text}}</p>
<p class="time">{{message.sender}} ? {{message.sentAt | fromNow}}</p>
</div>
<div class="avatar"
*ngIf="incoming">
<img src="{{message.author.avatarSrc}}">
</div>
</div>
`
FromNowPipe是一个管道,把消息的发送时间转换为像“×秒前”这样对用户友好的信息。如你所见,我们要这样使用它:{{message.sentAt | fromNow}}。
FromNowPipe使用优秀的moment.js类库。如果你想学习如何创建自定义管道,可以阅读FromNowPipe的源代码:code/rxjs/chat/app/ts/util/FromNowPipe.ts。
我们也在视图中充分利用了ngClass。当这样写时:
[ngClass]="{'msg-sent':!incoming, 'msg-receive':incoming}"
我们是在告诉Angular:如果incoming为真就使用msg-receive类(否则使用msg-sent类)。
借助incoming属性,我们就能以不同的形式来显示收到和发出的消息。
好了,把它们全部放在一起,就是一个完整的聊天应用了(如图13-13所示)!

图13-13 完成后的聊天应用
查看文件code/redux/angular2-redux-chat/app/ts/ChatExampleData.ts,你会发现我们已经写好了少量可以跟你聊天的机器人。检出这些代码并试着写几个自己的机器人吧!