在Web开发中,路由是指将应用划分成多个分区,通常是按照从浏览器的URL衍生出来的规则进行分割。
例如,访问一个网站的/路径时,我们有可能正在访问该网站的home路由;又例如,访问/about时,我们想要渲染的是关于页面;等等。
在应用程序中定义路由非常有用,因为我们可以:
●将应用程序划分为多个分区;
●维护应用程序的状态;
●基于某些规则保护应用分区。
假设我们正在开发类似于前面描述的库存应用程序。
第一次访问该应用程序时,首先看到的可能是搜索表单,用来输入搜索关键词并获得匹配的产品列表。
然后,单击某产品可以访问该产品的详细信息页面。
因为我们的应用程序是客户端,所以变换“页面”并不一定要更改URL。但是值得考量的是,如果为所有页面使用同样的URL,会有什么后果呢?
●刷新页面后,无法保留你在应用中的位置。
●不能为页面添加书签,方便以后返回相同的页面。
●无法与他人分享当前页面的URL。
反过来看,使用路由能让我们定义URL字符串,指定用户在应用中的位置。
在库存的例子中,我们可以为每个任务定义一系列不同的路由配置,如下所示。
●最初的根URL可能是http://our-app/。当访问该路径时,我们可能被重定向到home路由:http://our-app/home。
●当访问“About Us”区域时,URL地址可能变为http://our-app/about。这样,如果我们将http://our-app/about发给其他用户,他们会看到相同的页面。
也许你以前曾经编写过服务端的路由代码(这并不是完成本章的条件)。通常,在服务器端负责路由的情况下,收到HTTP请求后,服务器会根据收到的URL来运行相应的控制器。
例如,在Express.js 中,可以这样实现:
var express = require('express');
var router = express.Router();
// define the about route
router.get('/about', function(req, res){
res.send('About us');
});
在Ruby on Rails中,可以这样实现:
# routes.rb
get '/about', to:'pages#about'
# PagesController.rb
class PagesController < ActionController:Base
def about
render
end
end
每种框架的模式各不相同,但是在上面两种情况中,你都有一个服务器。它接收一个请求,并路由到一个控制器。该控制器根据路径和参数执行特定的任务。
客户端路由在概念上很相似,但是实施方法不同。在客户端路由的情况下,每次URL发生变化时,不一定会向服务器发送请求。我们把Angular应用叫作单页应用程序(single page app,SPA),因为服务器只提供一个页面,负责渲染各种页面的是JavaScript。
那么,如何才能在JavaScript代码中设定各个路由呢?
7.2.1 初级阶段:使用锚标记
在初级阶段,客户端路由使用了一个巧妙的方法:它不使用指向各种页面的客户端URL,而是使用锚标记。
可能你已经知道,锚标记的传统作用是直接链接到所在网页的其他位置,并让浏览器滚动到定义该锚标记元素所在的位置。例如,如果在HTML页面中定义这样的锚标记:
<!—— …… lots of page content here …… ——>
<a name="about"><h1>About</h1></a>
当访问http://something/#about这个URL时,浏览器将直接跳到这个定义about锚标记的H1标签。
SPA应用客户端框架使用的方式是:将锚标记作为路径来格式化,用它们代表应用程序的路由。
例如,SPA应用的about路由可能是http://something/#/about。这就是所谓的基于锚点标记的路由(hash-based routing)。
这个方法巧妙的地方在于,它看起来像一个“普通”的URL,因为它以锚标记和斜杠开头(/about)。
7.2.2 进化:HTML5客户端路由
随着HTML5的引入,浏览器获得了新的能力:在不需要新请求的情况下,允许在代码中创建新的浏览器记录项并显示适当的URL。
这是利用history.pushState方法来实现的,该方法允许JavaScript控制浏览器的导航历史。
因此,现代框架可以不依赖锚标记方法来进行路由导航,而是依赖pushState在无需重新加载的情况下控制浏览器历史。
 AngularJS注意事项:AngularJS应用已经可以使用这种路由方法了,但是需要使用$locationProvider.html5Mode(true)来特别启用。
在Angular中,HTML5路由是默认的模式。在本章后面,我们将讲解如何从HTML5模式退回到老的锚标记模式。

使用HTML5路由模式的时候,需要注意以下两点。
(1)并非所有的浏览器都支持HTML5路由模式,所以如果需要支持老版浏览器,你可能会被迫使用基于锚点标记的路由模式。
(2)服务器必须支持基于HTML5的路由。
为什么服务器必须要支持基于HTML5路由?我们将在后面深入讨论。
Angular文档建议使用HTML5路由模式,但是鉴于上一节提到的种种挑战,我们会在例子中使用基于锚点标记的路由模式进行简化。
在Angular中,我们通过将路径映射到处理它们的组件来配置路由。
我们来创建一个有多种路由的小型应用程序。在这个例子应用程序中,我们将有三种路由:
●主页,使用/#/home路径;
●关于页面,使用/#/about路径;
●联系我们页面,使用/#/contact路径;
最后,当用户访问根路径(/#/)时,重定向到主页路径。
我们使用三种主要部件来配置Angular路由。
●Routes:描述了应用程序支持的路由配置。
●RouterOutlet:这是一个“占位符”组件,用于告诉Angular要把每个路由的内容放在哪里。
●RouterLink指令:用于创建各种路由链接。
让我们来进一步讨论它们。
7.4.1 导入
为了使用Angular的路由器,首先从@angular/router库中导入一些常量。
code/routes/basic/app/ts/app.ts
import {
RouterModule,
Routes
} from '@angular/router';
现在,我们可以开始定义路由器配置了。
7.4.2 路由配置
为了定义应用的路由配置,首先创建一个Routes配置,然后使用RouterModule.forRoot(routes)来为应用程序提供使用路由器必需的依赖。
code/routes/basic/app/ts/app.ts
const routes:Routes = [
{ path:'', redirectTo:'home', pathMatch:'full' },
{ path:'home', component:HomeComponent },
{ path:'about', component:AboutComponent },
{ path:'contact', component:ContactComponent },
{ path:'contactus', redirectTo:'contact' },
];
注意关于路由配置的以下事项。
●path:指定了该路由要处理的URL路径。
●component:用于连接当前路由路径与处理该路由的组件。
●redirectTo:一个可选选项,用于将当前路径重定向到另一个已知路由。
综上所述,路由配置的目的是指定组件要处理的路径。
重定向
在路由定义中使用redirectTo是在告诉路由器,在访问该路由的path时,我们想让浏览器重定向到另一个路由。
在上面的示例代码中,如果访问http://localhost:8080/#/根路径,我们将被重定向到home路由。
另一个例子是contactus路由。
code/routes/basic/app/ts/app.ts
{ path:'contactus', redirectTo:'contact' },
在这种情况下,如果访问http://localhost:8080/#/contactus这个URL,那么浏览器将重定向到/contact。

示例代码 本节例子的完整代码可以在示例代码中的routes/basic目录中找到。查阅README.md文件,了解构建和运行本例的步骤。
路由需要多种导入声明,我们在下面的例子中不会逐一列出全部的导入声明。但是,我们为每个例子列出了源文件的文件名和行号。如果你遇到不知道如何导入某些类的问题,请使用编辑器打开代码文件并查看完整代码。
在阅读本节的同时,尝试运行代码并随意发挥可以获得更加深刻的认识。
7.4.3 安装路由配置
现在有了路由配置routes,我们需要安装它。为了在应用中使用路由配置,首先要对NgModule进行两项修改:
(1)导入RouterModule;
(2)在NgModule中的imports数组里使用RouterModule.forRoot(routes)来安装路由配置。
下面是为本应用在NgModule中配置的路由。
code/routes/basic/app/ts/app.ts
const routes:Routes = [
{ path:'', redirectTo:'home', pathMatch:'full' },
{ path:'home', component:HomeComponent },
{ path:'about', component:AboutComponent },
{ path:'contact', component:ContactComponent },
{ path:'contactus', redirectTo:'contact' },
];
@NgModule({
declarations:[
RoutesDemoApp,
HomeComponent,
AboutComponent,
ContactComponent
],
imports:[
BrowserModule,
RouterModule.forRoot(routes)// <—— routes
],
bootstrap:[ RoutesDemoApp ],
providers:[
{ provide:LocationStrategy, useClass:HashLocationStrategy }
]
})
class RoutesDemoAppModule {}
platformBrowserDynamic().bootstrapModule(RoutesDemoAppModule)
.catch((err:any)=> console.error(err));
7.4.4 使用<router-outlet>调用RouterOutlet指令
当路由发生变化时,我们希望保留外部“布局”模板,只用路由的组件替换页面的“内部”。
为了指定Angular在页面的什么地方渲染各种路由的内容,我们使用RouterOutlet指令。
组件的模板中指定了一些div结构、导航部分和一个名为router-outlet的指令。
router-outlet元素标示了各个路由组件的内容应该在哪里被渲染。
我们可以在模板中使用router-outlet指令,因为已经在NgModule中导入了RouterModule。
下面是应用中用于承载导航的组件及其模板。
code/routes/basic/app/ts/app.ts
@Component({
selector:'router-app',
template:`
<div>
<nav>
<a>Navigation:</a>
<ul>
<li><a [routerLink]="['home']">Home</a></li>
<li><a [routerLink]="['about']">About</a></li>
<li><a [routerLink]="['contact']">Contact Us</a></li>
</ul>
</nav>
<router-outlet></router-outlet>
</div>
`
})
class RoutesDemoApp {
}
仔细查看上面模板的内容,你将发现router-outlet元素在导航目录的正下方。当访问/home时,这里便是HomeComponent模板被渲染的地方。其他组件的渲染位置也是一样的。
7.4.5 使用[routerLink]调用routerLink指令
我们现在知道路由组件的模板将在哪里被渲染,那么如何才能让Angular导航到一个指定路由呢?
我们可以尝试使用纯HTML,像这样直接链接到路由:
<a href="/#/home">Home</a>
但是如果这样做,点击这个链接将触发页面重载,而这是开发单页应用时要杜绝的。
要解决这个问题,Angular提供了一个方案,可以在不重载页面的情况下链接路由:使用routerLink指令。
该指令允许你使用特殊的语法写链接。
code/routes/basic/app/ts/app.ts
<a>Navigation:</a>
<ul>
<li><a [routerLink]="['home']">Home</a></li>
<li><a [routerLink]="['about']">About</a></li>
<li><a [routerLink]="['contact']">Contact Us</a></li>
</ul>
我们可以在左手边看到[routerLink],它将该指令用于当前元素(<a>标签)。
在右手边是一组数组,它的第一个元素是路由的路径,比如"['home']"或者 "['about']",用来指定点击该元素时应该导航到哪个路由。
routerLink的值是一串包含了一组字符串数组(例如"['home']")的字符串,看起来可能比较奇怪。这是因为在链接路由时,你可以提供更多信息。我们将在介绍子路由和路由参数时进行更加详尽的讲解。
我们暂时只使用来自于根应用组件的路由名字。
现在有了所有的基本部件,可以来整合它们,实现路由导航了。
我们需要修改的第一个文件是应用程序的index.html。
下面是该文件的完整代码。
code/routes/basic/app/index.html
<!doctype html>
<html>
<head>
<base href="/">
<title>ng-book 2:Angular Router</title>
{% for(var css in o.htmlWebpackPlugin.files.css){ %}
<link href="{%=o.htmlWebpackPlugin.files.css[css] %}" rel="stylesheet">
{% } %}
</head>
<body>
<router-app></router-app>
<script src="/core.js"></script>
<script src="/vendor.js"></script>
<script src="/bundle.js"></script>
</body>
</html>
描述htmlWebpackPlugin的部分来自于webpack模块捆绑器。我们在本章中使用了webpack,它是一个帮你捆绑资源的工具。
你可能很熟悉这些代码,但是下面这行除外:
<base href="/">
这行声明了HTML标签base。传统上,该标签的作用是使用相对路径来告知浏览器去哪里查找图片和其他资源。
Angular的路由器也依赖这个标签来确定如何构建它的路由信息。
例如,如果一个路由的路径为/hello,base元素声明是href="/app",那么应用程序将使用/app/#/hello作为实际路径。
有时候,Angular应用开发者对应用中HTML的head部分没有访问权。比如在重用已有大型应用的页头和页脚时。
幸运的是,我们有方法处理这种情况。你可以在配置NgModule时,像这样使用APP_BASE_HREF提供者,用代码来声明应用程序的基准路径:
@NgModule({
declarations:[ RoutesDemoApp ],
imports:[
BrowserModule,
RouterModule.forRoot(routes)// <—— routes
],
bootstrap:[ RoutesDemoApp ],
providers:[
{ provide:LocationStrategy, useClass:HashLocationStrategy },
{ provide:APP_BASE_HREF, useValue:'/' } // <—— this right here
]
})
将{ provide:APP_BASE_HREF, useValue:'/' }放到providers中,等同于在应用的HTML页头里使用<base href="/">。
7.5.1 创建组件
在处理主应用组件之前,首先创建三个简单的组件,每种路由各一个。
●HomeComponent
HomeComponent只有一个h1标签,显示Welcome!。下面是HomeComponent的完整代码。
code/routes/basic/app/ts/components/HomeComponent.ts
/*
* Angular
*/
import {Component} from '@angular/core';
@Component({
selector:'home',
template:`<h1>Welcome!</h1>`
})
export class HomeComponent {
}
●AboutComponent
同样,AboutComponent也只有一个基本的h1。
code/routes/basic/app/ts/components/AboutComponent.ts
/*
* Angular
*/
import {Component} from '@angular/core';
@Component({
selector:'about',
template:`<h1>About</h1>`
})
export class AboutComponent {
}
●ContactComponent
AboutComponent也是一样。
code/routes/basic/app/ts/components/ContactComponent.ts
/*
* Angular
*/
import {Component} from '@angular/core';
@Component({
selector:'contact',
template:`<h1>Contact Us</h1>`
})
export class ContactComponent {
}
这些组件并没有什么特别之处,所以让我们开始探讨主app.ts文件。
7.5.2 应用程序组件
现在我们需要创建一个根级“应用程序”组件,将所有的部件组装起来。
我们先从core和router库导入需要的模块。
code/routes/basic/app/ts/app.ts
/*
* Angular Imports
*/
import {
NgModule,
Component
} from '@angular/core';
import {BrowserModule} from '@angular/platform-browser';
import {platformBrowserDynamic} from '@angular/platform-browser-dynamic';
import {
RouterModule,
Routes
} from '@angular/router';
import {LocationStrategy, HashLocationStrategy} from '@angular/common';
接下来,导入上面创建的三个组件。
code/routes/basic/app/ts/app.ts
import {HomeComponent} from 'components/HomeComponent';
import {AboutComponent} from 'components/AboutComponent';
import {ContactComponent} from 'components/ContactComponent';
现在,让我们真正深入到组件代码之中。首先声明组件选择器和模板。
code/routes/basic/app/ts/app.ts
@Component({
selector:'router-app',
template:`
<div>
<nav>
<a>Navigation:</a>
<ul>
<li><a [routerLink]="['home']">Home</a></li>
<li><a [routerLink]="['about']">About</a></li>
<li><a [routerLink]="['contact']">Contact Us</a></li>
</ul>
</nav>
<router-outlet></router-outlet>
</div>
`
})
class RoutesDemoApp {
}
我们将为这个组件使用两个路由指令:RouterOutlet和RouterLink。这两个指令和其他公共路由指令一起,在我们将RouterModule放置到NgModule的imports数组中时被导入进来。
作为回顾,RouterOutlet指令指定了路由内容在模板中被渲染的位置,即模板代码中<router-outlet></router-outlet>的位置。
RouterLink指令创建指向路由的导航链接。
code/routes/basic/app/ts/app.ts
<a>Navigation:</a>
<ul>
<li><a [routerLink]="['home']">Home</a></li>
<li><a [routerLink]="['about']">About</a></li>
<li><a [routerLink]="['contact']">Contact Us</a></li>
</ul>
使用[routerLink]将指示Angular获取click事件的所有权,然后基于路由的定义,初始化路由器并导航到正确的位置。
7.5.3 配置路由
接下来,我们创建一组类型为Routes的对象数组,并用它来声明路由配置。
code/routes/basic/app/ts/app.ts
const routes:Routes = [
{ path:'', redirectTo:'home', pathMatch:'full' },
{ path:'home', component:HomeComponent },
{ path:'about', component:AboutComponent },
{ path:'contact', component:ContactComponent },
{ path:'contactus', redirectTo:'contact' },
];
在app.ts文件的最后,我们这样引导应用。
code/routes/basic/app/ts/app.ts
@NgModule({
declarations:[
RoutesDemoApp,
HomeComponent,
AboutComponent,
ContactComponent
],
imports:[
BrowserModule,
RouterModule.forRoot(routes)// <—— routes
],
bootstrap:[ RoutesDemoApp ],
providers:[
{ provide:LocationStrategy, useClass:HashLocationStrategy }
]
})
class RoutesDemoAppModule {}
platformBrowserDynamic().bootstrapModule(RoutesDemoAppModule)
.catch((err:any)=> console.error(err));
与一贯的做法一样,我们引导应用并指定RoutesDemoApp为根组件。
注意,我们将所有必需的组件放到declarations里。如果要路由到一个组件,那么必须在某个NgModule(当前模块或者导入的模块)里面声明它。
在imports中,我们有RouterModule.forRoot(routes)。RouterModule.forRoot(routes)是一个函数,接收我们的路由对象数组并配置路由器,然后返回依赖列表,例如RouteRegistry、Location和其他一些路由器运行时必需的类。
在providers中,我们有:
{ provide:LocationStrategy, useClass:HashLocationStrategy }
下面深入讲解这行代码的作用。
定位策略(location strategy)是Angular应用从路由定义进行解析和创建路径的方式。
在AngularJS中,它被称作routing mode。
Angular的默认策略为PathLocationStrategy,也就是HTML5路由。在使用这个策略时,路由的路径是常规路径,例如/home或者/contact。
通过将LocationStrategy类绑定到新的策略类实例,我们可以改变应用的定位策略。
我们可以不使用默认的PathLocationStrategy,而是使用HashLocationStrategy。
我们使用锚点标记策略作为默认策略,因为如果使用HTML5路由,那么URL将成为普通的路径(而非使用锚点标记或者锚标签)。
这样,当你在客户端点击一个链接时,路由应该能正常工作并进行导航,比如从/about到/contact。
如果刷新页面,我们向服务器索要的就不是服务器提供的根URL,而是/about或者/contact。因为服务器端没有对应/about的页面,所以它会返回404.
该默认策略适用于基于锚点标记的路径,例如/#/home或者/#/contact。服务器将它们解析为/路径(这也是AngularJS的默认模式)。
如何在产品中使用HTML5模式呢?
要使用HTML5模式路由,你必须配置服务器来将所有“不存在”的路由重定向到根URL。
在routes/basic项目中,我们包含了一个脚本,可在webpack-dev-server环境下开发,并使用HTML5路径。
要使用它,需要cd routes/basic并运行node html5-dev-server.js。
最后,为了让示例应用适合这个新的策略,必须首先导入LocationStrategy和HashLocationStrategy。
code/routes/basic/app/ts/app.ts
import {LocationStrategy, HashLocationStrategy} from '@angular/common';
然后将定位策略添加到NgModule的providers。
code/routes/basic/app/ts/app.ts
providers:[
{ provide:LocationStrategy, useClass:HashLocationStrategy }
]
你可以编写自己的策略。只需要扩展LocationStrategy类并实现一些方法即可。开始的好方法是阅读Angular的HashLocationStrategy或者PathLocationStrategy类的源代码。
在示例应用的目录中,有一个名为app/ts/app.html5.ts的文件。
如果你想试试默认的PathLocationStrategy,那么将这个文件的内容复制到app/ts/app.ts中,然后重新加载应用即可。
现在,你可以到应用的根目录(code/routes)并运行npm run server来启动应用程序。
当你在浏览器中输入http://localhost:8080/时,应该能看到home路由被渲染了(如图7-1所示)。
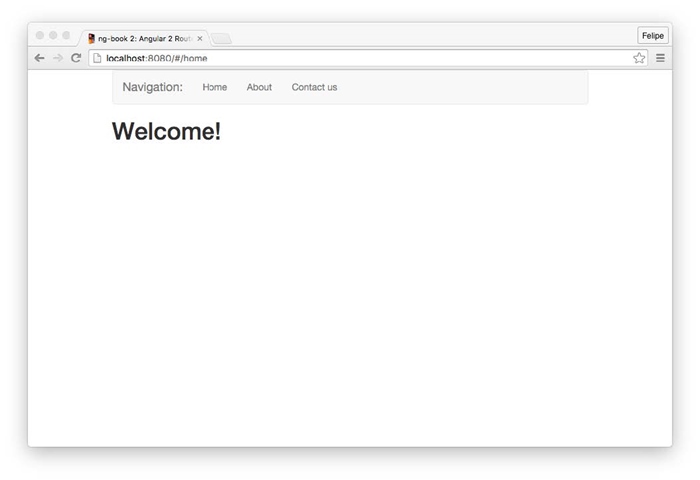
图7-1 Home路由
注意,浏览器中的URL被重定向到了http://localhost:8080/#/home。
现在点击每个链接,就会渲染相应的路由(分别如图7-2、图7-3所示)。
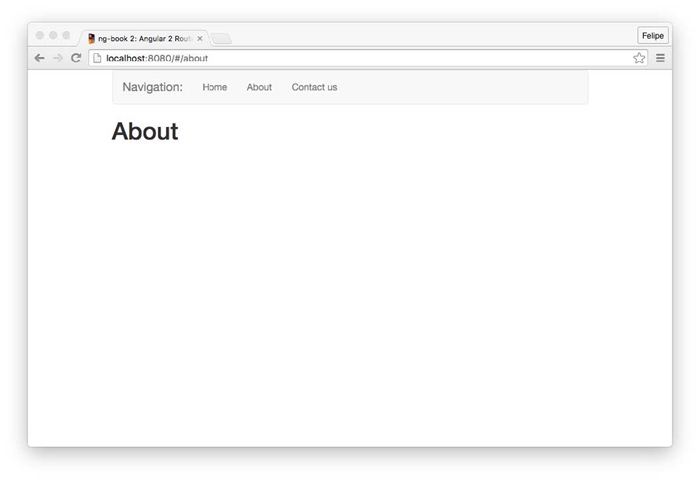
图7-2 About路由
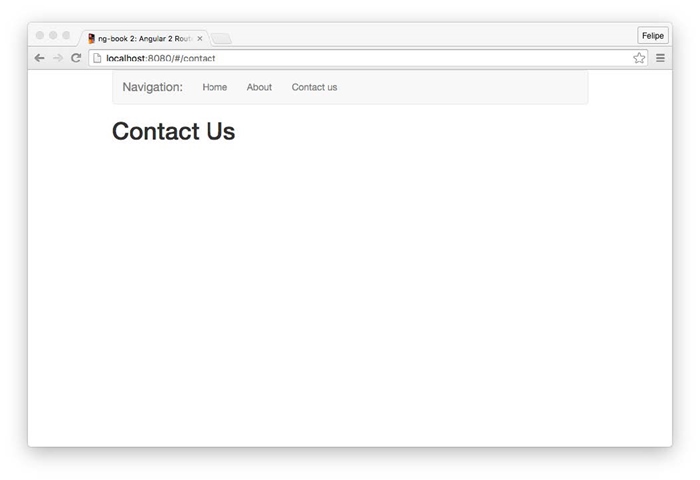
图7-3 Contact Us路由
我们经常希望在应用程序中导航到特定的资源。例如,假设我们有一个新闻网站,它拥有很多文章。每篇文章可能有一个ID。如果有一篇ID为3的文章,那么可以通过下面的URL来导航到这篇文章:
/articles/3
如果有一篇ID为4的文章,我们可以在这里访问它:
/articles/4
以此类推。
很显然,我们不是为每篇文章编写一个路由,而是使用一个变量或者路由参数。我们可以像这样在路径段前面添加一个冒号,设定路由接收一个参数:
/route/:param
在示例新闻站里,我们可以这样定义路由:
/articles/:id
为了添加参数到路由配置,我们这样指定路由路径。
code/routes/music/app/ts/app.ts
const routes:Routes = [
{ path:'', redirectTo:'search', pathMatch:'full' },
{ path:'search', component:SearchComponent },
{ path:'artists/:id', component:ArtistComponent },
{ path:'tracks/:id', component:TrackComponent },
{ path:'albums/:id', component:AlbumComponent },
];
当我们访问路由/artist/123时,123部分是被传到路由的id路由参数。
但是,如何获取特定路由的参数呢?这正是使用路由参数的地方。
ActivatedRoute
为了使用路由参数,我们首先需要导入ActivatedRoute:
import { ActivatedRoute } from '@angular/router';
接下来,将ActivatedRoute注入组件的构造函数中。例如,假设我们有一个这样定义的Routes:
const routes:Routes = [
{ path:'articles/:id', component:ArticlesComponent }
];
然后,在开发ArticleComponent时,我们将ActivatedRoute作为参数添加到构造函数:
export class ArticleComponent {
id:string;
constructor(private route:ActivatedRoute){
route.params.subscribe(params => { this.id = params['id']; });
}
}
注意,route.params是一个可观察对象。我们可以使用.subscribe将参数值提取到固定值。在这种情况下,我们将params['id']赋值给组件实例的变量id。
现在,在访问/articles/230时,组件的id属性应该接收230。
下面来编写一个更加复杂的应用。我们将构建一个音乐搜索应用(如图7-4所示),它具有以下特性:
(1)按照提供的关键词搜索曲目;
(2)在数据表格中显示匹配曲目;
(3)点击歌手名字时,显示歌手介绍;
(4)点击专辑名字时,显示专辑信息和曲目列表;
(5)点击歌曲名字时,显示曲目信息并允许用户试听。
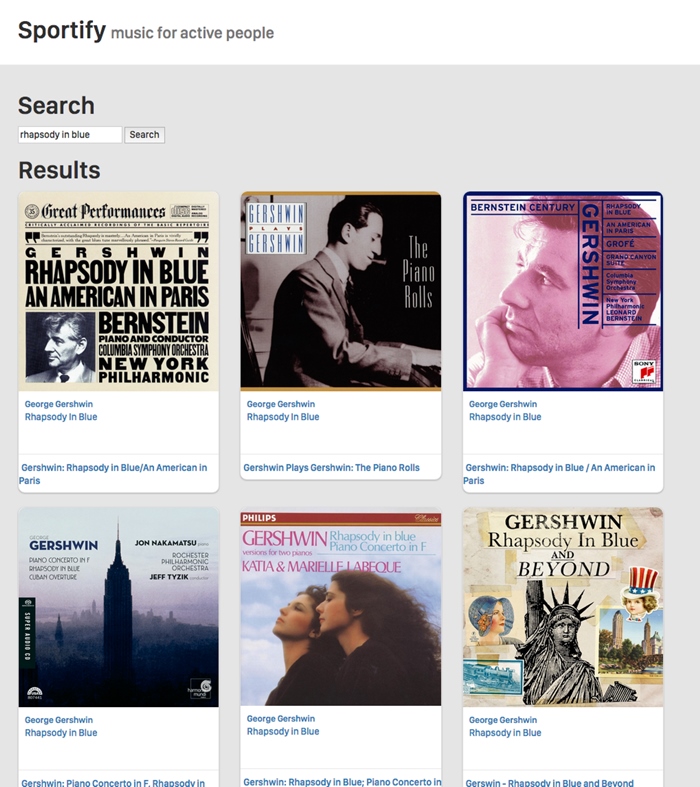
图7-4 音乐应用的搜索视图
这个应用需要的路由如下所示。
●/search:搜索表格和搜索结果。
●/artists/:id:艺术家信息,接收Spotify的ID为参数。
●/albums/:id:专辑信息,包含曲目列表,接收Spotify的ID。
●/tracks/:id:曲目信息和试听,也接收Spotify的ID。
示例代码 本节例子的完整代码可以在示例代码中的routes/music目录中找到。查阅README.md文件,了解构建和运行本例的步骤。
我们将使用Spotify API来获取曲目、艺术家和专辑的信息。
7.10.1 首要步骤
我们要写的第一个文件是app.ts。首先,从Angular导入需要的类。
code/routes/music/app/ts/app.ts
/*
* Angular Imports
*/
import {
Component
} from '@angular/core';
import { NgModule } from '@angular/core';
import { BrowserModule } from '@angular/platform-browser';
import { platformBrowserDynamic } from '@angular/platform-browser-dynamic';
import { HttpModule } from '@angular/http';
import { FormsModule } from '@angular/forms';
import {
RouterModule,
Routes
} from '@angular/router';
import {
LocationStrategy,
HashLocationStrategy,
APP_BASE_HREF
} from '@angular/common';
/*
* Components
*/
现在我们有了所有导入声明,接下来考虑每个路由的组件。
●Search路由:新建SearchComponent。该组件将连接Spotify API并执行搜索功能,然后在数据表格中显示搜索结果。
●Artists路由:新建ArtistComponent,显示艺术家信息。
●Albums路由:新建AlbumComponent,显示专辑的曲目列表。
●Tracks路由:新建TrackComponent,显示曲目并允许试听。
因为新组件需要与Spotify API交互,所以我们需要创建一个服务,它使用http模块来调用API服务器。
应用的一切都依赖这些数据,所以我们首先创建SpotifyService。
7.10.2 SpotifyService
你可以在示例代码中的routes/music/app/ts/services目录找到SpotifyService的完整代码。
我们要实现的第一个方法是searchByTrack,它将利用提供的关键词来搜索曲目。
Spotify API文档中描述了API端点中有一个名为Search endpoint的端点。
该端点正是我们想要的:它接收一个查询对象(使用q参数)和一个type参数。
在这种情况下,查询对象是搜索关键词。因为搜索的是歌曲,所以type为track。
服务的第一个版本可能如下所示:
class SpotifyService {
constructor(public http:Http){
}
searchByTrack(query:string){
let params:string = [
`q=${query}`,
`type=track`
].join("&");
let queryURL:string = `https://api.spotify.com/v1/search?${params}`;
return this.http.request(queryURL).map(res => res.json());
}
}
这段代码向https://api.spotify.com/v1/search这一URL执行HTTP GET请求,传入query(搜索关键词)和硬编码为track的type。
该http调用返回一个Observable。我们将进一步使用RxJS函数map转换搜索结果(一个http模块的Response对象)并将它解析为JSON,最终获得一个对象。
任何调用searchByQuery的函数都可以使用Observable API来订阅它的响应:
service
.searchTrack('query')
.subscribe((res:any)=> console.log('Got object', res))
7.10.3 SearchComponent
现在我们有了执行曲目搜索的服务,可以开始编写SearchComponent了。
同样,以导入声明开始。
code/routes/music/app/ts/components/SearchComponent.ts
/*
* Angular
*/
import {Component, OnInit} from '@angular/core';
import {
Router,
ActivatedRoute,
} from '@angular/router';
/*
* Services
*/
import {SpotifyService} from 'services/SpotifyService';
这里,我们导入了刚刚新建的SpotifyService类和一些其他类。
我们的目标是像卡片一样一条一条地渲染曲目搜索结果,如图7-5所示。

图7-5 音乐应用的卡片
现在开始开发组件。我们用search作为选择器,并使用下面的模板。该模板有点长,因为我们适当添加了一些样式,但是相比我们迄今做过的那些,它并不复杂。
code/routes/music/app/ts/components/SearchComponent.ts
@Component({
selector:'search',
template:`
<h1>Search</h1>
<p>
<input type="text" #newquery
[value]="query"
(keydown.enter)="submit(newquery.value)">
<button(click)="submit(newquery.value)">Search</button>
</p>
<div *ngIf="results">
<div *ngIf="!results.length">
No tracks were found with the term '{{ query }}'
</div>
<div *ngIf="results.length">
<h1>Results</h1>
<div class="row">
<div class="col-sm-6 col-md-4" *ngFor="let t of results">
<div class="thumbnail">
<div class="content">
<img src="{{ t.album.images[0].url }}" class="img-responsive">
<div class="caption">
<h3>
<a [routerLink]="['/artists', t.artists[0].id]">
{{ t.artists[0].name }}
</a>
</h3>
<br>
<p>
<a [routerLink]="['/tracks', t.id]">
{{ t.name }}
</a>
</p>
</div>
<div class="attribution">
<h4>
<a [routerLink]="['/albums', t.album.id]">
{{ t.album.name }}
</a>
</h4>
</div>
</div>
</div>
</div>
</div>
</div>
</div>
`
})
●搜索框
下面来分段分析HTML模板。
搜索框在第一段中。
code/routes/music/app/ts/components/SearchComponent.ts
<p>
<input type="text" #newquery
[value]="query"
(keydown.enter)="submit(newquery.value)">
<button(click)="submit(newquery.value)">Search</button>
</p>
这里,我们插入了输入框,并将其DOM元素的value属性绑定到组件的query属性。
我们还给这个元素赋予了一个模板变量,名为#newquery。这样我们就可以在模板中通过newquery.value来直接访问该输入框的值。
按钮将触发组件的submit方法,将输入框的值当作参数传入。
我们还希望在用户按下回车键以后触发submit事件,所以将keydown.enter事件绑定到输入框。
●搜索结果和链接
接下来的部分显示搜索结果。我们依靠ngFor指令来迭代返回对象中的每条曲目。
code/routes/music/app/ts/components/SearchComponent.ts
<div class="row">
<div class="col-sm-6 col-md-4" *ngFor="let t of results">
<div class="thumbnail">
我们为每条曲目显示其艺术家的名字。
code/routes/music/app/ts/components/SearchComponent.ts
<h3>
<a [routerLink]="['/artists', t.artists[0].id]">
{{ t.artists[0].name }}
</a>
</h3>
注意我们是如何使用RouterLink指令来重定向到['/artists', t.artists[0].id]的。
这是为特定路由设置路由参数的方法。假设有一个id为abc123的艺术家,当这个链接被点击时,本应用将导航到/artist/abc123(abc123是:id参数)。
下面将展示如何在该路由对应的组件中获取这个参数。
现在,我们这样显示曲目:
code/routes/music/app/ts/components/SearchComponent.ts
<p>
<a [routerLink]="['/tracks', t.id]">
{{ t.name }}
</a>
</p>
这样显示专辑:
code/routes/music/app/ts/components/SearchComponent.ts
<h4>
<a [routerLink]="['/albums', t.album.id]">
{{ t.album.name }}
</a>
</h4>
●SearchComponent类
先看看它的构造函数。
code/routes/music/app/ts/components/SearchComponent.ts
export class SearchComponent implements OnInit {
query:string;
results:Object;
constructor(private spotify:SpotifyService,
private router:Router,
private route:ActivatedRoute){
this.route
.queryParams
.subscribe(params => { this.query = params['query'] || ''; });
}
我们声明了两个属性:
●query,用来处理当前搜索关键词;
●results,用来存储搜索结果。
在构造函数的参数中,我们注入了(之前创建的)SpotifyService、Router和ActivatedRoute,并将它们设置为类属性。
在构造函数中,我们用subscribe订阅到queryParams属性。通过它,我们可以访问查询参数,比如搜索关键词(params['query'])。
在一个像http://localhost/#/search?query=cats&order=ascending这样的URL中,queryParams以对象的形式为我们提供路由参数。这就是说,我们可以从params['order']中访问order(在本例中为ascending)。
另外,注意queryParams与route.params有所不同。route.params在路由配置中匹配参数,而queryParams在查询字符串中匹配参数。
在本例中,如果没有query参数,那么我们将this.query设置为空字符串。
●search方法
在SearchComponent中,我们将调用SpotifyService服务并渲染搜索结果。我们要在下面两种情况下运行搜索:
●当用户输入搜索关键词并提交表单时;
●当用户使用带有查询参数的URL导航到本页面时(例如,用其他人共享的链接或者收藏的本页面链接)。
为了在上面两种情况下执行实际的搜索,我们创建了search方法。
code/routes/music/app/ts/components/SearchComponent.ts
search():void {
console.log('this.query', this.query);
if(!this.query){
return;
}
this.spotify
.searchTrack(this.query)
.subscribe((res:any)=> this.renderResults(res));
}
search函数通过当前this.query属性的值来得知应该搜索什么。因为我们在构造函数中订阅了queryParams,所以可以确认this.query总是有最新的搜索关键词。
然后,我们订阅到searchTrack可观察对象。这样,只要有新搜索结果到达,我们就调用renderResults。
code/routes/music/app/ts/components/SearchComponent.ts
renderResults(res:any):void {
this.results = null;
if(res && res.tracks && res.tracks.items){
this.results = res.tracks.items;
}
}
我们声明了组件属性results。只要它的值有变化,Angular就会自动更新视图。
●在页面加载时进行搜索
正如上面指出的,我们希望在URL包含搜索查询参数时,能够直接自动获取搜索结果。
为了达到这个目标,我们将实现一个Angular路由器提供的钩子,在组件初始化的时候运行它。
这难道不是构造函数要做的吗?既正确,也不正确。正确是因为构造函数是用来初始化变量值的,但是如果想要撰写优质、容易测试的代码,你就要最小化对象构建的副作用。请记住,你应该像下面这样,将组件初始化代码放到一个钩子函数里。
下面是ngOnInit方法的代码。
code/routes/music/app/ts/components/SearchComponent.ts
ngOnInit():void {
this.search();
}
为了使用ngOnInit,我们导入OnInit接口,并声明组件类implements OnInit。
正如你所看到的,我们在这里仅仅执行了搜索。因为我们的搜索关键词来自于URL,所以这没有问题。
●提交表单
现在来看看在用户提交表单的时候,我们应该干什么。
code/routes/music/app/ts/components/SearchComponent.ts
submit(query:string):void {
this.router.navigate(['search'], { queryParams:{ query:query } })
.then(_ => this.search());
}
我们手动告诉路由器导航到搜索路由,并提供了query参数,然后执行搜索功能。
这样做为我们带来了很大的好处:如果刷新浏览器,我们将会看到一样的搜索结果。可以说,我们将搜索关键词保存到URL了。
●整合
下面是SearchComponent类的完整代码。
code/routes/music/app/ts/components/SearchComponent.ts
/*
* Angular
*/
import {Component, OnInit} from '@angular/core';
import {
Router,
ActivatedRoute,
} from '@angular/router';
/*
* Services
*/
import {SpotifyService} from 'services/SpotifyService';
@Component({
selector:'search',
template:`
<h1>Search</h1>
<p>
<input type="text" #newquery
[value]="query"
(keydown.enter)="submit(newquery.value)">
<button(click)="submit(newquery.value)">Search</button>
</p>
<div *ngIf="results">
<div *ngIf="!results.length">
No tracks were found with the term '{{ query }}'
</div>
<div *ngIf="results.length">
<h1>Results</h1>
<div class="row">
<div class="col-sm-6 col-md-4" *ngFor="let t of results">
<div class="thumbnail">
<div class="content">
<img src="{{ t.album.images[0].url }}" class="img-responsive">
<div class="caption">
<h3>
<a [routerLink]="['/artists', t.artists[0].id]">
{{ t.artists[0].name }}
</a>
</h3>
<br>
<p>
<a [routerLink]="['/tracks', t.id]">
{{ t.name }}
</a>
</p>
</div>
<div class="attribution">
<h4>
<a [routerLink]="['/albums', t.album.id]">
{{ t.album.name }}
</a>
</h4>
</div>
</div>
</div>
</div>
</div>
</div>
</div>
`
})
export class SearchComponent implements OnInit {
query:string;
results:Object;
constructor(private spotify:SpotifyService,
private router:Router,
private route:ActivatedRoute){
this.route
.queryParams
.subscribe(params => { this.query = params['query'] || ''; });
}
ngOnInit():void {
this.search();
}
submit(query:string):void {
this.router.navigate(['search'], { queryParams:{ query:query } })
.then(_ => this.search());
}
search():void {
console.log('this.query', this.query);
if(!this.query){
return;
}
this.spotify
.searchTrack(this.query)
.subscribe((res:any)=> this.renderResults(res));
}
renderResults(res:any):void {
this.results = null;
if(res && res.tracks && res.tracks.items){
this.results = res.tracks.items;
}
}
}
7.10.4 尝试搜索
我们已经完成了搜索代码,现在来试一试(如图7-6所示)。
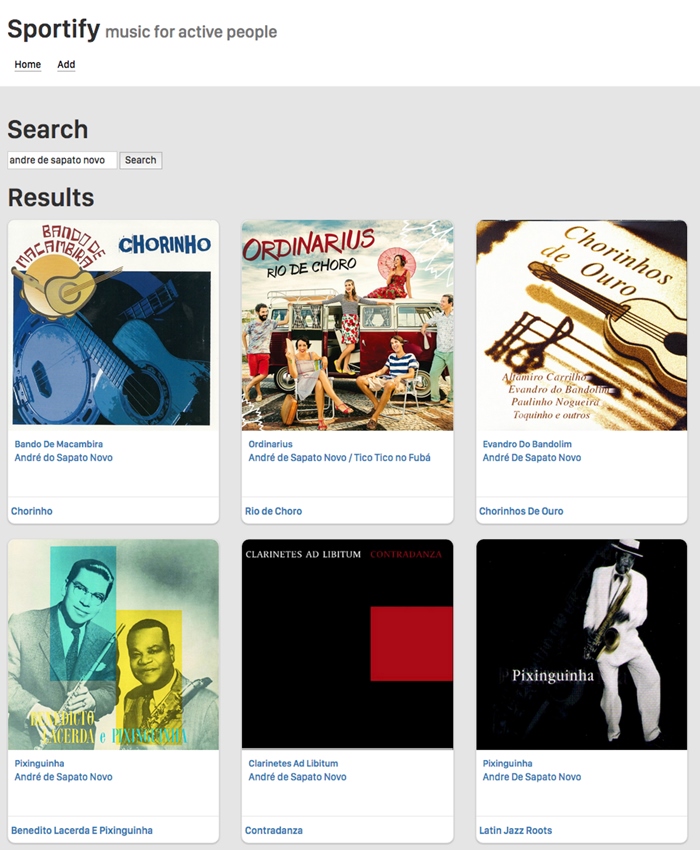
图7-6 尝试搜索
可以点击艺术家、曲目或者专辑链接来导航到相应的路由。
7.10.5 TrackComponent
我们用TrackComponent来处理曲目路由。它显示曲目名字和专辑封面图片,并允许用户使用HTML5的audio标签来进行试听。
code/routes/music/app/ts/components/TrackComponent.ts
template:`
<div *ngIf="track">
<h1>{{ track.name }}</h1>
<p>
<img src="{{ track.album.images[1].url }}">
</p>
<p>
<audio controls src="{{ track.preview_url }}"></audio>
</p>
<p><a href(click)="back()">Back</a></p>
</div>
`
和我们为搜索功能所做的一样,在这里使用Spotify API。让我们重构searchTrack方法,从中提取两个有用的方法,以供复用。
code/routes/music/app/ts/services/SpotifyService.ts
export class SpotifyService {
static BASE_URL:string = 'https://api.spotify.com/v1';
constructor(private http:Http){
}
query(URL:string, params?:Array<string>):Observable<any[]> {
let queryURL:string = `${SpotifyService.BASE_URL}${URL}`;
if(params){
queryURL = `${queryURL}?${params.join('&')}`;
}
return this.http.request(queryURL).map((res:any)=> res.json());
}
search(query:string, type:string):Observable<any[]> {
return this.query(`/search`, [
`q=${query}`,
`type=${type}`
]);
}
现在,我们已经将这些方法分离到SpotifyService。注意searchTrack方法变得简单多了。
code/routes/music/app/ts/services/SpotifyService.ts
searchTrack(query:string):Observable<any[]> {
return this.search(query, 'track');
}
然后创建一个方法,让我们正在开发的组件可以根据曲目的id来获取曲目信息。
code/routes/music/app/ts/services/SpotifyService.ts
getTrack(id:string):Observable<any[]> {
return this.query(`/tracks/${id}`);
}
最后,在TrackComponent的新ngOnInit方法中调用getTrack。
code/routes/music/app/ts/components/TrackComponent.ts
ngOnInit():void {
this.spotify
.getTrack(this.id)
.subscribe((res:any)=> this.renderTrack(res));
}
其他组件的工作原理很相似,它们都使用SpotifyService中的get*方法来根据id获取艺术家或曲目信息。
7.10.6 音乐搜索应用小结
现在,我们有了一个比较实用的音乐搜索和预览应用(如图7-7所示)。你可以试用它并搜索一些喜欢的音乐!

图7-7 完成路由之后
在变换路由前,我们可能想要触发一些行为。典型的例子是用户认证。假设我们有登录路由和被保护的路由。
我们希望只有在登录页面中提供了正确的用户名和密码的时候,才允许应用导航到被保护的路由。
为了实现这个功能,我们需要连接到路由的生命周期钩子,并在激活被保护的路由时获得通知。然后调用一个认证服务,查询用户是否提供了正确的凭证。
要检查一个组件是否可以被激活,我们添加了一个守卫类到路由器配置的canActivate数组。
让我们再次修改最初的应用程序,添加用户名和密码输入框以及一个新的被保护的路由,该路由只在提供了指定的用户名和密码组合后才能被访问。
示例代码 本节例子的完整代码可以在示例代码中的routes/auth目录中找到。
查阅README.md文件,了解构建和运行本例的步骤。
7.11.1 AuthService
我们来创建一个十分简单的最小化服务,负责认证和授权资源。
code/routes/auth/app/ts/services/AuthService.ts
import { Injectable } from '@angular/core';
@Injectable()
export class AuthService {
login(user:string, password:string):boolean {
if(user === 'user' && password === 'password'){
localStorage.setItem('username', user);
return true;
}
return false;
}
login方法将在提供的用户名和密码为'user'和'password'时返回true。此外,在它们匹配时,使用localStorage来保存用户名。它标志着应用程序是否有一个仍然活跃的已登录用户。
如果你不熟悉,这里解释一下:localStorage是HTML5提供的键值对,用来在浏览器中保存信息。
它的API非常简单,仅仅包含了设置、读取和删除里面项目的方法。
参见MDN上的Storage文档查看详情。
logout方法清除了username值。
code/routes/auth/app/ts/services/AuthService.ts
logout():any {
localStorage.removeItem('username');
}
最后两个方法是:
●getUser,返回用户名或者null;
●isLoggedIn,使用getUser()并在有用户时返回true。
下面是这些方法的代码。
code/routes/auth/app/ts/services/AuthService.ts
getUser():any {
return localStorage.getItem('username');
}
isLoggedIn():boolean {
return this.getUser()!== null;
}
最后一件要做的事是导出一个AUTH_PROVIDERS,这样可以将其注入到应用中。
code/routes/auth/app/ts/services/AuthService.ts
export var AUTH_PROVIDERS:Array<any> = [
{ provide:AuthService, useClass:AuthService }
];
至此,我们有了用于注入到组件的AuthService服务,可以实现用户登录、检查当前登录用户和用户登出等。
随后,我们还将在路由器中使用它来保护ProtectedComponent。不过我们首先创建用于登录的组件。
7.11.2 LoginComponent
这个组件将在没有登录用户的时候显示登录表单,或者显示一条包含了用户信息和登录链接的小横幅。
下面是login和logout方法的代码。
code/routes/auth/app/ts/components/LoginComponent.ts
export class LoginComponent {
message:string;
constructor(private authService:AuthService){
this.message = '';
}
login(username:string, password:string):boolean {
this.message = '';
if(!this.authService.login(username, password)){
this.message = 'Incorrect credentials.';
setTimeout(function(){
this.message = '';
}.bind(this), 2500);
}
return false;
}
logout():boolean {
this.authService.logout();
return false;
}
在服务验证用户凭证后,我们就登入用户。
根据用户的登录状态,组件模板中有两段代码片段分别被显示出来。
第一段是登录表单,受到*ngIf="!authService.getUser()"保护。
code/routes/auth/app/ts/components/LoginComponent.ts
<form class="form-inline" *ngIf="!authService.getUser()">
<div class="form-group">
<label for="username">User:</label>
<input class="form-control" name="username" #username>
</div>
<div class="form-group">
<label for="password">Password:</label>
<input class="form-control" type="password" name="password" #password>
</div>
<a class="btn btn-default"(click)="login(username.value, password.value)">
Submit
</a>
</form>
第二段是信息横幅,包含了登出链接,受到相反的*ngIf="authService.getUser()"保护。
code/routes/auth/app/ts/components/LoginComponent.ts
<div class="well" *ngIf="authService.getUser()">
Logged in as <b>{{ authService.getUser()}}</b>
<a href(click)="logout()">Log out</a>
</div>
另外,在出现验证错误时,会显示一段代码片段。
code/routes/auth/app/ts/components/LoginComponent.ts
<div class="alert alert-danger" role="alert" *ngIf="message">
{{ message }}
</div>
现在我们就可以处理用户登录了,接下来创建想要被用户登录保护的资源。
7.11.3 ProtectedComponent组件和路由守卫
●ProtectedComponent
要保护组件,必先有组件。ProtectedComponent组件很简明。
code/routes/auth/app/ts/components/ProtectedComponent.ts
/*
* Angular
*/
import {Component} from '@angular/core';
@Component({
selector:'protected',
template:`<h1>Protected content</h1>`
})
export class ProtectedComponent {
}
我们希望只有登录的用户可以访问这个组件。但是如何才能做到呢?
答案是使用路由器钩子canActivate,连接到一个实现CanActivate接口的守卫类。
●LoggedInGuard守卫
新建一个名为guards的目录,然后新建loggedIn.guard.ts文件。
code/routes/auth/app/ts/guards/loggedIn.guard.ts
import { Injectable } from '@angular/core';
import { CanActivate } from '@angular/router';
import { AuthService } from 'services/AuthService';
@Injectable()
export class LoggedInGuard implements CanActivate {
constructor(private authService:AuthService){}
canActivate():boolean {
return this.authService.isLoggedIn();
}
}
该守卫声明了它实现CanActivate接口。可以通过实现canActivate方法满足这个声明。
我们注入AuthService到这个类的构造函数,并将其保存到私有变量authService。
在canActivate函数中,我们通过this.AuthService来检查用户的登录状态isLoggedIn。
●配置路由器
为了使用这个守卫,我们需要这样配置路由器:
(1)导入LoggedInGuard;
(2)在路由配置中使用LoggedInGuard;
(3)添加LoggedInGuard到提供者列表中(这样它就可以被注入了)。
我们在app.ts中实现以上步骤。
首先导入LoggedInGuard。
code/routes/auth/app/ts/app.ts
import {AUTH_PROVIDERS} from 'services/AuthService';
import {LoggedInGuard} from 'guards/loggedIn.guard';
然后将带有守卫的canActivate添加到被保护的路由。
code/routes/auth/app/ts/app.ts
const routes:Routes = [
{ path:'', redirectTo:'home', pathMatch:'full' },
{ path:'home', component:HomeComponent },
{ path:'about', component:AboutComponent },
{ path:'contact', component:ContactComponent },
{ path:'protected', component:ProtectedComponent,
canActivate:[LoggedInGuard]}
];
最后将LoggedInGuard添加到提供者列表中。
code/routes/auth/app/ts/app.ts
providers:[
AUTH_PROVIDERS,
LoggedInGuard,
{ provide:LocationStrategy, useClass:HashLocationStrategy },
]
●用户登录
我们必须添加:
code/routes/auth/app/ts/app.ts
import {LoginComponent} from 'components/LoginComponent';
然后添加:
(1)一个新链接,指向被保护的路由;
(2)<login>标签到模板中,用来渲染新组件。
下面是app.ts的代码。
code/routes/auth/app/ts/app.ts
@Component({
selector:'router-app',
template:`
<div class="page-header">
<div class="container">
<h1>Router Sample</h1>
<div class="navLinks">
<a [routerLink]="['/home']">Home</a>
<a [routerLink]="['/about']">About</a>
<a [routerLink]="['/contact']">Contact Us</a>
<a [routerLink]="['/protected']">Protected</a>
</div>
</div>
</div>
<div id="content">
<div class="container">
<login></login>
<hr>
<router-outlet></router-outlet>
</div>
</div>
`
})
class RoutesDemoApp {
constructor(private router:Router){
}
}
现在,在浏览器打开应用时,我们可以看到新的登录表单和被保护的链接(如图7-8所示)。
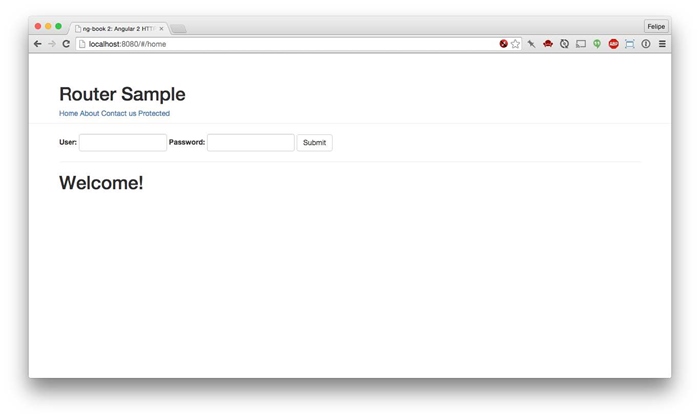
图7-8 认证应用:初始页
如果点击被保护的链接,什么也不会发生。手动访问http://localhost:8080/#/protected的效果也是一样。
在表单中输入用户名和密码,点击Submit按钮。你将看到一条显示了当前用户的横幅(如图7-9所示)。
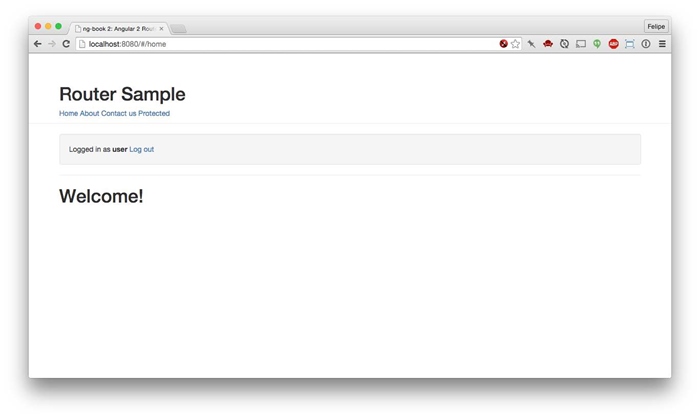
图7-9 认证应用:登录后
正如我们所料,在点击被保护的链接时,我们被重定向了,而且组件也被渲染了(如图7-10所示)。
安全注意事项:在过于依赖客户端路由保护为我们提供安全性之前,理解它的工作机制是至关重要的。实际上,你应该把客户端路由保护看作用户体验的一种形式,而不是安全的一种形式。
归根到底,应用的所有JavaScript代码都会服务于客户端。不管用户是否已经登录,这些代码都能被检测到。
因此,如果有敏感数据需要保护,你必须使用服务器端认证来保护它们。也就是说,对每条查询数据的请求,都要求用户提供一个服务器验证的有效API密钥(或者认证令牌)。
构建完整的认证系统超出了本书的范围。最重要的是要明白,在客户端保护路由并不一定会阻挡任何人查看这些路由背后的JavaScript页面。
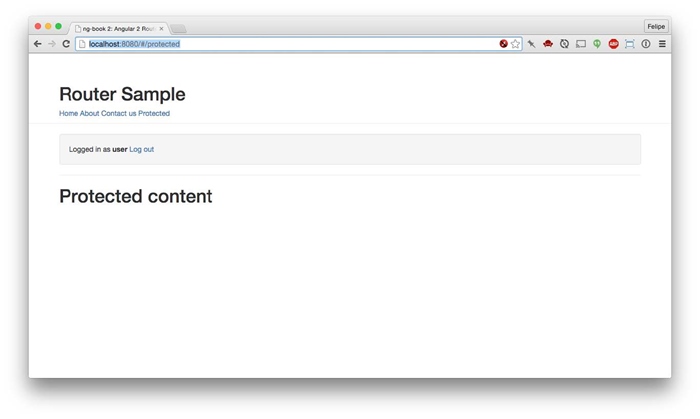
图7-10 认证应用:受保护区域
嵌套路由是在一些路由中包含其他路由。利用嵌套路由,我们可以封装父级路由的功能,并在它的子级路由中使用这些功能。
假设我们有个网站,它有一个“我们是谁?”区域,允许用户了解我们的团队。它还有一个叫作“产品”的区域。
我们可能认为“我们是谁?”的完美路由是/about,“产品”的完美路由是/products。
然后,在访问这些区域时,我们很高兴地显示了所有团队和所有产品。
但是,如果随着网站的成长,我们需要显示团队中每个人的个人信息以及每种产品的信息该怎么办?
为了支持这种情况,路由器要允许用户定义嵌套路由。
你可以有多重嵌套的router-outlet。这样,应用的每个区域都可以有自己的子组件,这些组件也可以有自己的router-outlet。
下面用一个示例进行讲解。
在本例中,我们有一个产品区,用户在其中可以通过访问一个特殊的URL查看两种推荐的产品。对于其他的产品,路由会使用产品ID。
示例代码 本节例子的完整代码可以在示例代码中的routes/nested目录中找到。查阅README.md文件,了解构建和运行本例的步骤。
7.12.1 配置路由
首先在app.ts文件中描述两种顶级路由。
code/routes/nested/app/ts/app.ts
const routes:Routes = [
{ path:'', redirectTo:'home', pathMatch:'full' },
{ path:'home', component:HomeComponent },
{ path:'products', component:ProductsComponent, children:childRoutes }
];
home路由看起来很眼熟;注意products有个children参数。它是从哪儿来的?我们在定义ProductsComponent时定义了childRoutes。
7.12.2 ProductsComponent组件
这个组件有自己的路由配置。
code/routes/nested/app/ts/components/ProductsComponent.ts
export const routes:Routes = [
{ path:'', redirectTo:'main',pathMatch:'full'},
{ path:'main', component:MainComponent },
{ path:':id', component:ByIdComponent },
{ path:'interest', component:InterestComponent },
{ path:'sportify', component:SportifyComponent },
];
注意,在第一个对象上面有个空的path。这么做是为了在访问/products时重定向到main路由。
我们要看的另一个路由是:id。在这种情况下,当用户访问一些没有可以匹配的路由时,此路由就会垫底。在/之后传进来的一切都将被提取为路由的参数,即id。
然后在组件的路由器中为每种静态子路由添加一个链接。
code/routes/nested/app/ts/components/ProductsComponent.ts
<a [routerLink]="['./main']">Main</a> |
<a [routerLink]="['./interest']">Interest</a> |
<a [routerLink]="['./sportify']">Sportify</a> |
可以看到路由链接的格式都是['./main'],前面有./。它表明了导航到main路由是相对于当前路由上下文的。
你也可以用['products', 'main']的形式声明路由。这么做的坏处是,子路由知晓父路由;如果想要移动或者复用该组件,可能需要重新编写路由链接。
添加链接后,我们添加一个输入框让用户可以输入产品ID,以及一个按钮在点击后导航到该产品。最后添加了router-outlet。
code/routes/nested/app/ts/components/ProductsComponent.ts
template:`
<h2>Products</h2>
<div class="navLinks">
<a [routerLink]="['./main']">Main</a> |
<a [routerLink]="['./interest']">Interest</a> |
<a [routerLink]="['./sportify']">Sportify</a> |
Enter id:<input #id size="6">
<button(click)="goToProduct(id.value)">Go</button>
</div>
<div class="products-area">
<router-outlet></router-outlet>
</div>
`
让我们看看ProductsComponent的代码。
code/routes/nested/app/ts/components/ProductsComponent.ts
export class ProductsComponent {
constructor(private router:Router, private route:ActivatedRoute){
}
goToProduct(id:string):void {
this.router.navigate(['./', id], {relativeTo:this.route});
}
}
首先,我们在构造函数中声明了一个Router的实例变量,因为我们将使用该实例来通过id导航到产品。
想要查看某产品时,我们使用goToProduct方法。在goToProduct方法中,我们调用路由器的navigate方法并提供路由名字和包含路由参数的对象。在本例中,我们简单地传递了id。
注意,我们在navigate函数中使用相对路径./。为了使用相对路径,我们还要将一个relativeTo对象作为选项传入,它告诉路由器究竟是相对于哪个路由。
运行应用程序,我们将看到主页,如图7-11所示。
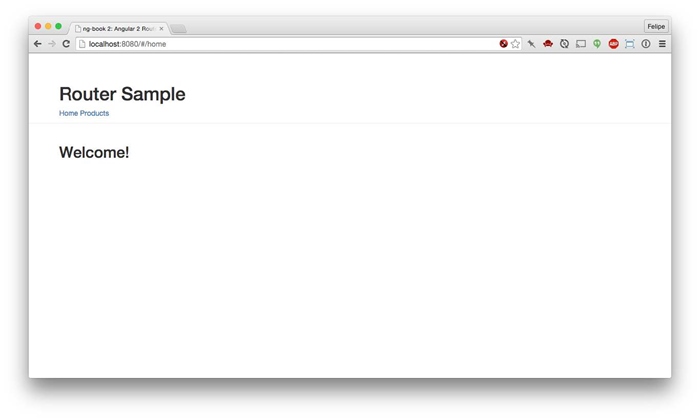
图7-11 嵌套的路由应用
如果点击产品链接,你将被重定向到/products/main,如图7-12所示。
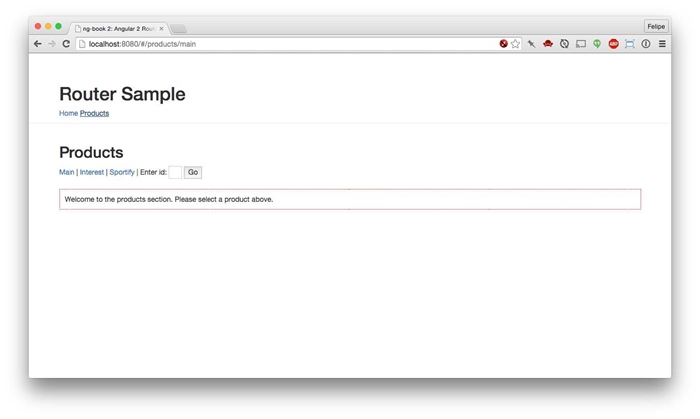
图7-12 嵌套的路由应用:产品区
灰色细线下面的所有内容都是使用主应用的router-outlet来渲染的。
虚线方框里面的内容是在ProductComponent的router-outlet中渲染的。这就是配置父级和子级路由分别进行渲染的方法。
当访问其中一个产品链接时,或者在文本框中输入id并点击Go按钮后,新的内容将在ProductComponent组件中的路由出口中渲染(如图7-13所示)。
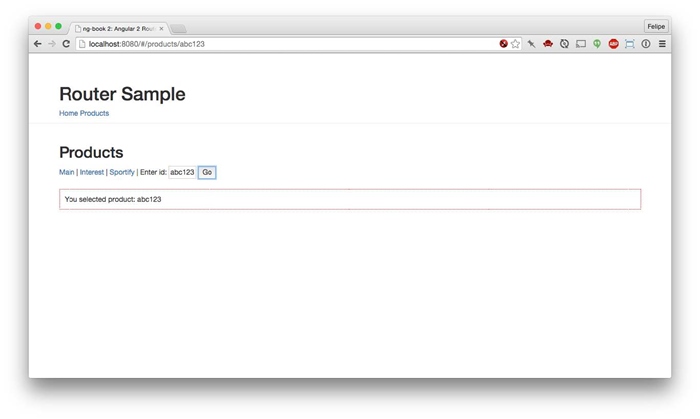
图7-13 嵌套路由应用:按ID查询产品
另外,值得注意的是Angular的路由器很智能,它会优先使用具体路由(比如/products/spotify),然后才使用参数化的路由(比如/products/123)。这样,/products/sportify将不会被更加通用的、捕捉所有路由的/products/:id处理。
嵌套路由的重定向和链接
作为回顾,我们使用['myRoute']来导航到名为MyRoute的顶级路由。但是,只有当你在同样的顶级上下文中时,这种方法才可行。
在子级组件中,如果你试图链接或重定向到['myRoute'],路由器将试图寻找一个兄弟路由,故而出错。在这种情况下,使用以斜杠开头的['/myRoute']。
同样,在顶级上下文中,如果想要链接或重定向到一个子级路由,我们需要使用路由定义数组的多个元素。
假设我们想要访问Show路由;它是Product路由的子级。在这种情况下,我们使用['product', 'show'],正如路由定义所示。
正如我们所看到的,全新的Angular路由器非常强大和灵活。现在就在你的应用中使用路由器吧!