
Angular提供了若干内置指令。在本章中,我们将探讨每一个内置指令并通过示例教会你如何使用它们。
 内置指令是已经导入过的,你的组件可以直接使用它们。因此,不用像你自己的组件一样把它们作为指令导入进来。
如果你希望根据一个条件来决定显示或隐藏一个元素,可以使用ngIf指令。这个条件是由你传给指令的表达式的结果决定的。
如果表达式的结果返回的是一个假值,那么元素会从DOM上被移除。
下面是一些例子:
<div *ngIf="false"></div> <!—— never displayed ——>
<div *ngIf="a > b"></div> <!—— displayed if a is more than b ——>
<div *ngIf="str == 'yes'"></div> <!—— displayed if str holds the string "yes" ——>
<div *ngIf="myFunc()"></div> <!—— displayed if myFunc returns a true value ——>
如果你有AngularJS的经验,那么大概以前已经用过ngIf指令了。你可以把它当作AngularJS中ng-if的替代品。但另一方面,Angular并没有为AngularJS中的ng-show指令提供内置的替代品。那么,如果你只是想改变一个元素的CSS可见性,就应该使用ngStyle或class指令。本章稍后会介绍它们。
有时候你需要根据一个给定的条件来渲染不同的元素。
遇到这种情况时,你可能会像下面这样多次使用ngIf:
<div class="container">
<div *ngIf="myVar == 'A'">Var is A</div>
<div *ngIf="myVar == 'B'">Var is B</div>
<div *ngIf="myVar!= 'A' && myVar!= 'B'">Var is something else</div>
</div>
如你所见,当myVar的值既不是A也不是B时,代码将变得相当繁琐,其实我们真正想表达的只是一个else而已。随着我们添加的值越来越多,ngIf条件也会变得越来越复杂。
为了说明这种增长的复杂性,假设我们想要处理一个新的值C。
为了达到目的,我们不仅要添加一个使用ngIf的新元素,而且要修改最后一种情况:
<div class="container">
<div *ngIf="myVar == 'A'">Var is A</div>
<div *ngIf="myVar == 'B'">Var is B</div>
<div *ngIf="myVar == 'C'">Var is C</div>
<div *ngIf="myVar!= 'A' && myVar!= 'B' && myVar!= 'C'">Var is something else</div>
</div>
对于这种情况,Angular引入了ngSwitch指令。
如果你熟悉switch语句的话,应该会觉得似曾相识。
指令背后的思想也是一样的:对表达式进行一次求值,然后根据其结果来决定如何显示指令内的嵌套元素。
一旦有了结果,我们就可以:
●使用ngSwitchCase指令描述已知结果;
●使用ngSwitchDefault指令处理所有其他未知情况。
让我们使用这组新的指令来重写之前的例子:
<div class="container" [ngSwitch]="myVar">
<div *ngSwitchCase="'A'">Var is A</div>
<div *ngSwitchCase="'B'">Var is B</div>
<div *ngSwitchDefault>Var is something else</div>
</div>
如果想要处理新值C,只需要插入一行:
<div class="container" [ngSwitch]="myVar">
<div *ngSwitchCase="'A'">Var is A</div>
<div *ngSwitchCase="'B'">Var is B</div>
<div *ngSwitchCase="'C'">Var is C</div>
<div *ngSwitchDefault>Var is something else</div>
</div>
不需要修改默认(即备用)条件。
ngSwitchDefault元素是可选的。如果我们不用它,那么当myVar没有匹配到任何期望的值时就不会渲染任何东西。
你也可以为不同的元素声明同样的*ngSwitchCase值,这样就可以多次匹配同一个值了。例子如下:
code/built_in_directives/app/ts/ng_switch/ng_switch.ts
template:`
<h4 class="ui horizontal divider header">
Current choice is {{ choice }}
</h4>
<div class="ui raised segment">
<ul [ngSwitch]="choice">
<li *ngSwitchCase="1">First choice</li>
<li *ngSwitchCase="2">Second choice</li>
<li *ngSwitchCase="3">Third choice</li>
<li *ngSwitchCase="4">Fourth choice</li>
<li *ngSwitchCase="2">Second choice, again</li>
<li *ngSwitchDefault>Default choice</li>
</ul>
</div>
<div style="margin-top:20px;">
<button class="ui primary button"(click)="nextChoice()">
Next choice
</button>
</div>
`
在上面的例子中,当choice的值是2的时候,第2个和第5个li都会被渲染。
使用ngStyle指令,可以通过Angular表达式给特定的DOM元素设定CSS属性。
该指令最简单的用法就是[style.<cssproperty>]="value"的形式,下面是一个例子。
code/built_in_directives/app/ts/ng_style/ng_style.ts
<div [style.background-color]="'yellow'">
Uses fixed yellow background
</div>
这个代码片段就是使用ngStyle指令把CSS的background-color属性设置为字符串字面量yellow。
另一种设置固定值的方式就是使用ngStyle属性,使用键值对来设置每个属性。
code/built_in_directives/app/ts/ng_style/ng_style.ts
<div [ngStyle]="{color:'white', 'background-color':'blue'}">
Uses fixed white text on blue background
</div>

注意,在ngStyle的说明中,我们对background-color使用了单引号,但却没有对color使用。这是为什么呢?因为ngStyle的参数是一个JavaScript对象,而color是一个合法的键,不需要引号。但是在background-color中,连字符是不允许出现在对象的键名当中的,除非它是一个字符串,因此使用了引号。
通常情况下,我尽量不会对对象的键使用引号,除非不得不用。
我们在这里同时设置了color和background-color属性。
但ngStyle指令真正的能力在于使用动态值。
在这个例子中,我们定义了两个输入框。
code/built_in_directives/app/ts/ng_style/ng_style.ts
<div class="ui input">
<input type="text" name="color" value="{{color}}" #colorinput>
</div>
<div class="ui input">
<input type="text" name="fontSize" value="{{fontSize}}" #fontinput>
</div>
<button class="ui primary button"(click)="apply(colorinput.value, fontinput\
.value)">
Apply settings
</button>
然后使用它们的值来设置三个元素的CSS属性。
在第一个元素中,我们基于输入框的值来设定字体大小。
code/built_in_directives/app/ts/ng_style/ng_style.ts
<div>
<span [ngStyle]="{color:'red'}" [style.font-size.px]="fontSize">
red text
</span>
</div>
注意,我们在某些情况下必须指定单位。例如,把font-size设置为12不是合法的CSS,必须指定一个单位,比如12px或者1.2em。Angular提供了一个便捷语法用来指定单位:这里我们使用的格式是[style.fontSize.px]。
后缀.px表明我们设置font-size属性值以像素为单位。你完全可以把它替换为[style.font-size.em],以相对长度为单位来表示字体大小;还可以使用[style.fontSize.%],以百分比为单位。
另外两个元素使用#colorinput的值来设置文字颜色和背景颜色。
code/built_in_directives/app/ts/ng_style/ng_style.ts
<h4 class="ui horizontal divider header">
ngStyle with object property from variable
</h4>
<div>
<span [ngStyle]="{color:color}">
{{ color }} text
</span>
</div>
<h4 class="ui horizontal divider header">
style from variable
</h4>
<div [style.background-color]="color"
style="color:white;">
{{ color }} background
</div>
这样,当我们点击Apply settings按钮时,就会调用方法来设置新的值。
code/built_in_directives/app/ts/ng_style/ng_style.ts
apply(color:string, fontSize:number){
this.color = color;
this.fontSize = fontSize;
}
与此同时,文本颜色和字体大小都通过NgStyle指令作用在元素上了。
ngClass指令在HTML模板中用ngClass属性来表示,让你能动态设置和改变一个给定DOM元素的CSS类。
如果你用过AngularJS,会发现ngClass指令和过去在AngularJS中的ngClass所做的事是非常相似的。
使用这个指令的第一种方式是传入一个对象字面量。该对象希望以类名作为键,而值应该是一个用来表明是否应该应用该类的真/假值。
假设我们有一个叫作bordered的CSS类,用来给元素添加一个黑色虚线边框。
code/built_in_directives/app/css/styles.scss
.bordered {
border:1px dashed black;
background-color:#eee;
}
我们来添加两个div元素:一个一直都有bordered类(因此一直有边框),而另一个永远都不会有。
code/built_in_directives/app/ts/ng_class/ng_class.ts
<div [ngClass]="ordered:false">This is never bordered</div>
<div [ngClass]="ordered:true">This is always bordered</div>
如预期一样,两个div应该是如图4-1这样渲染的。

图4-1 ngClass指令的简单用法
当然,使用ngClass指令来动态分配类会有用得多。
为了动态使用它,我们添加了一个变量作为对象的值:
code/built_in_directives/app/ts/ng_class/ng_class.ts
<div [ngClass]="ordered:isBordered">
Using object literal.Border {{ isBordered ? "ON":"OFF" }}
</div>
或者在组件中定义该对象:
code/built_in_directives/app/ts/ng_class/ng_class.ts
export class NgClassSampleApp {
isBordered:boolean;
classesObj:Object;
classList:string[];
并直接使用它:
code/built_in_directives/app/ts/ng_class/ng_class.ts
<div [ngClass]="classesObj">
Using object var.Border {{ classesObj.bordered ? "ON":"OFF" }}
</div>
再次强调,当你使用像bordered-box这种包含连字符的类名时需要小心。JavaScript对象不允许字面量的键出现连字符。如果确实需要,那就必须像这样用字符串作为键:
<div [ngClass]="{'bordered-box':false}">……</div>
我们也可以使用一个类名列表来指定哪些类名会被添加到元素上。为此,我们可以传入一个数组型字面量:
code/built_in_directives/app/ts/ng_class/ng_class.ts
<div class="base" [ngClass]="['blue', 'round']">
This will always have a blue background and
round corners
</div>
或者在组件中声明一个数组对象:
this.classList = ['blue', 'round'];
并把它传进来:
code/built_in_directives/app/ts/ng_class/ng_class.ts
<div class="base" [ngClass]="classList">
This is {{ classList.indexOf('blue')> -1 ? "":"NOT" }} blue
and {{ classList.indexOf('round')> -1 ? "":"NOT" }} round
</div>
在上个例子中,[ngClass]分配的类名和通过HTML的class属性分配的已存在类名都是生效的。
最后添加到元素的类总会是HTML属性class中的类和[ngClass]指令求值结果得到的类的集合。
在这个例子中:
code/built_in_directives/app/ts/ng_class/ng_class.ts
<div class="base" [ngClass]="['blue', 'round']">
This will always have a blue background and
round corners
</div>
元素有全部的三个类:HTML的class属性提供的base,以及通过[ngClass]分配的blue和round(如图4-2所示)。
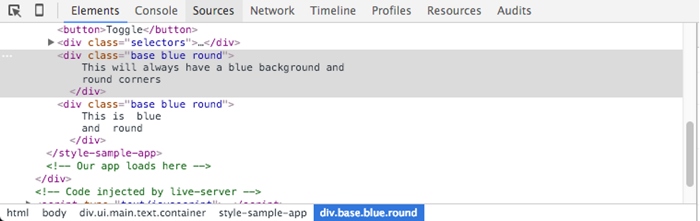
图4-2 来自属性和指令的CSS类
这个指令的任务是重复一个给定的DOM元素(或一组DOM元素),每次重复都会从数组中取一个不同的值。
这个指令是AngularJS中ng-repeat的继任者。
它的语法是*ngFor="let item of items"。
●let item语法指定一个用来接收items数组中每个元素的(模板)变量。
●items是来自组件控制器的一组项的集合。
要阐明这一点,我们来看一下代码示例。我们在组件控制器中声明了一个城市的数组:
this.cities = ['Miami', 'Sao Paulo', 'New York'];
然后在模板中有如下的HTML片段。
code/built_in_directives/app/ts/ng_for/ng_for.ts
<h4 class="ui horizontal divider header">
Simple list of strings
</h4>
<div class="ui list" *ngFor="let c of cities">
<div class="item">{{ c }}</div>
</div>
它会如你期望的那样在div中渲染每一个城市,如图4-3所示。

图4-3 使用ngFor指令的结果
我们还可以这样迭代一个对象数组。
code/built_in_directives/app/ts/ng_for/ng_for.ts
this.people = [
{ name:'Anderson', age:35, city:'Sao Paulo' },
{ name:'John', age:12, city:'Miami' },
{ name:'Peter', age:22, city:'New York' }
];
然后根据每一行数据渲染出一个表格。
code/built_in_directives/app/ts/ng_for/ng_for.ts
<h4 class="ui horizontal divider header">
List of objects
</h4>
<table class="ui celled table">
<thead>
<tr>
<th>Name</th>
<th>Age</th>
<th>City</th>
</tr>
</thead>
<tr *ngFor="let p of people">
<td>{{ p.name }}</td>
<td>{{ p.age }}</td>
<td>{{ p.city }}</td>
</tr>
</table>
结果如图4-4所示。

图4-4 渲染对象数组
我们还可以使用嵌套数组。如果想根据城市进行分组,可以定义一个新对象数组。
code/built_in_directives/app/ts/ng_for/ng_for.ts
this.peopleByCity = [
{
city:'Miami',
people:[
{ name:'John', age:12 },
{ name:'Angel', age:22 }
]
},
{
city:'Sao Paulo',
people:[
{ name:'Anderson', age:35 },
{ name:'Felipe', age:36 }
]
}
];
};
然后可以使用ngFor为每个城市渲染一个h2标签。
code/built_in_directives/app/ts/ng_for/ng_for.ts
<div *ngFor="let item of peopleByCity">
<h2 class="ui header">{{ item.city }}</h2>
并且使用一个嵌套指令对这个城市中的人们进行迭代。
code/built_in_directives/app/ts/ng_for/ng_for.ts
<table class="ui celled table">
<thead>
<tr>
<th>Name</th>
<th>Age</th>
</tr>
</thead>
<tr *ngFor="let p of item.people">
<td>{{ p.name }}</td>
<td>{{ p.age }}</td>
</tr>
</table>
下面是模板代码的最终结果。
code/built_in_directives/app/ts/ng_for/ng_for.ts
<h4 class="ui horizontal divider header">
Nested data
</h4>
<div *ngFor="let item of peopleByCity">
<h2 class="ui header">{{ item.city }}</h2>
<table class="ui celled table">
<thead>
<tr>
<th>Name</th>
<th>Age</th>
</tr>
</thead>
<tr *ngFor="let p of item.people">
<td>{{ p.name }}</td>
<td>{{ p.age }}</td>
</tr>
</table>
</div>
它会为每个城市渲染一个表格,如图4-5所示。

图4-5 渲染嵌套数组
获取索引
在迭代数组时,我们可能也要获取每一项的索引。
我们可以在ngFor指令的值中插入语法let idx = index并用分号分隔开,这样就可以获取索引了。这时候,Angular会把当前的索引分配给我们提供的变量(在这里是变量idx)。
 注意,和JavaScript一样,索引都是从0开始的。因此第一个元素的索引是0,第二个是1,以此类推。
对我们的第一个例子稍加改动,添加代码段let num = index。
code/built_in_directives/app/ts/ng_for/ng_for.ts
<div class="ui list" *ngFor="let c of cities; let num = index">
<div class="item">{{ num+1 }} - {{ c }}</div>
</div>
它会在城市的名称前面添加序号,如图4-6所示。
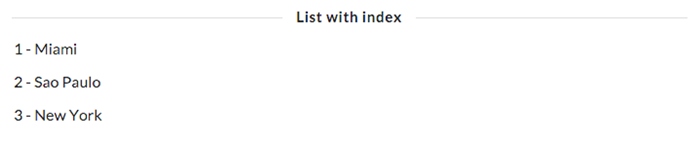
图4-6 使用索引
当我们想告诉Angular不要编译或者绑定页面中的某个特殊部分时,要使用ngNodBindable指令。
假设我们想在模板中渲染纯文本{{ content }}。通常情况下,这段文本会被绑定到变量content的值,因为我们使用了{{ }}模板语法。
那该如何渲染出纯文本{{ content }}呢?可以使用ngNonBindable指令。
假设我们想要用一个div来渲染变量content的内容,紧接着输出文本<- this is what {{ content }} rendered来指向变量实际的值。
为了做到这一点,要使用下面的模板。
code/built_in_directives/app/ts/ng_non_bindable/ng_non_bindable.ts
template:`
<div class='ngNonBindableDemo'>
<span class="bordered">{{ content }}</span>
<span class="pre" ngNonBindable>
← This is what {{ content }} rendered
</span>
</div>
`
有了ngNonBindable属性,Angular不会编译第二个span里的内容,而是原封不动地将其显示出来(如图4-7所示)。

图4-7 使用ngNonBindable的结果
Angular的核心指令数量很少,但我们却能通过组合这些简单的指令来创建五花八门的应用。